Checklist for AI Recipe Video Creation
• Updated
AI recipe video creation transforms written recipes into engaging videos using tools like text-to-video and image-to-video AI. This approach eliminates the need for filming, saving time and money. Here's how to get started:
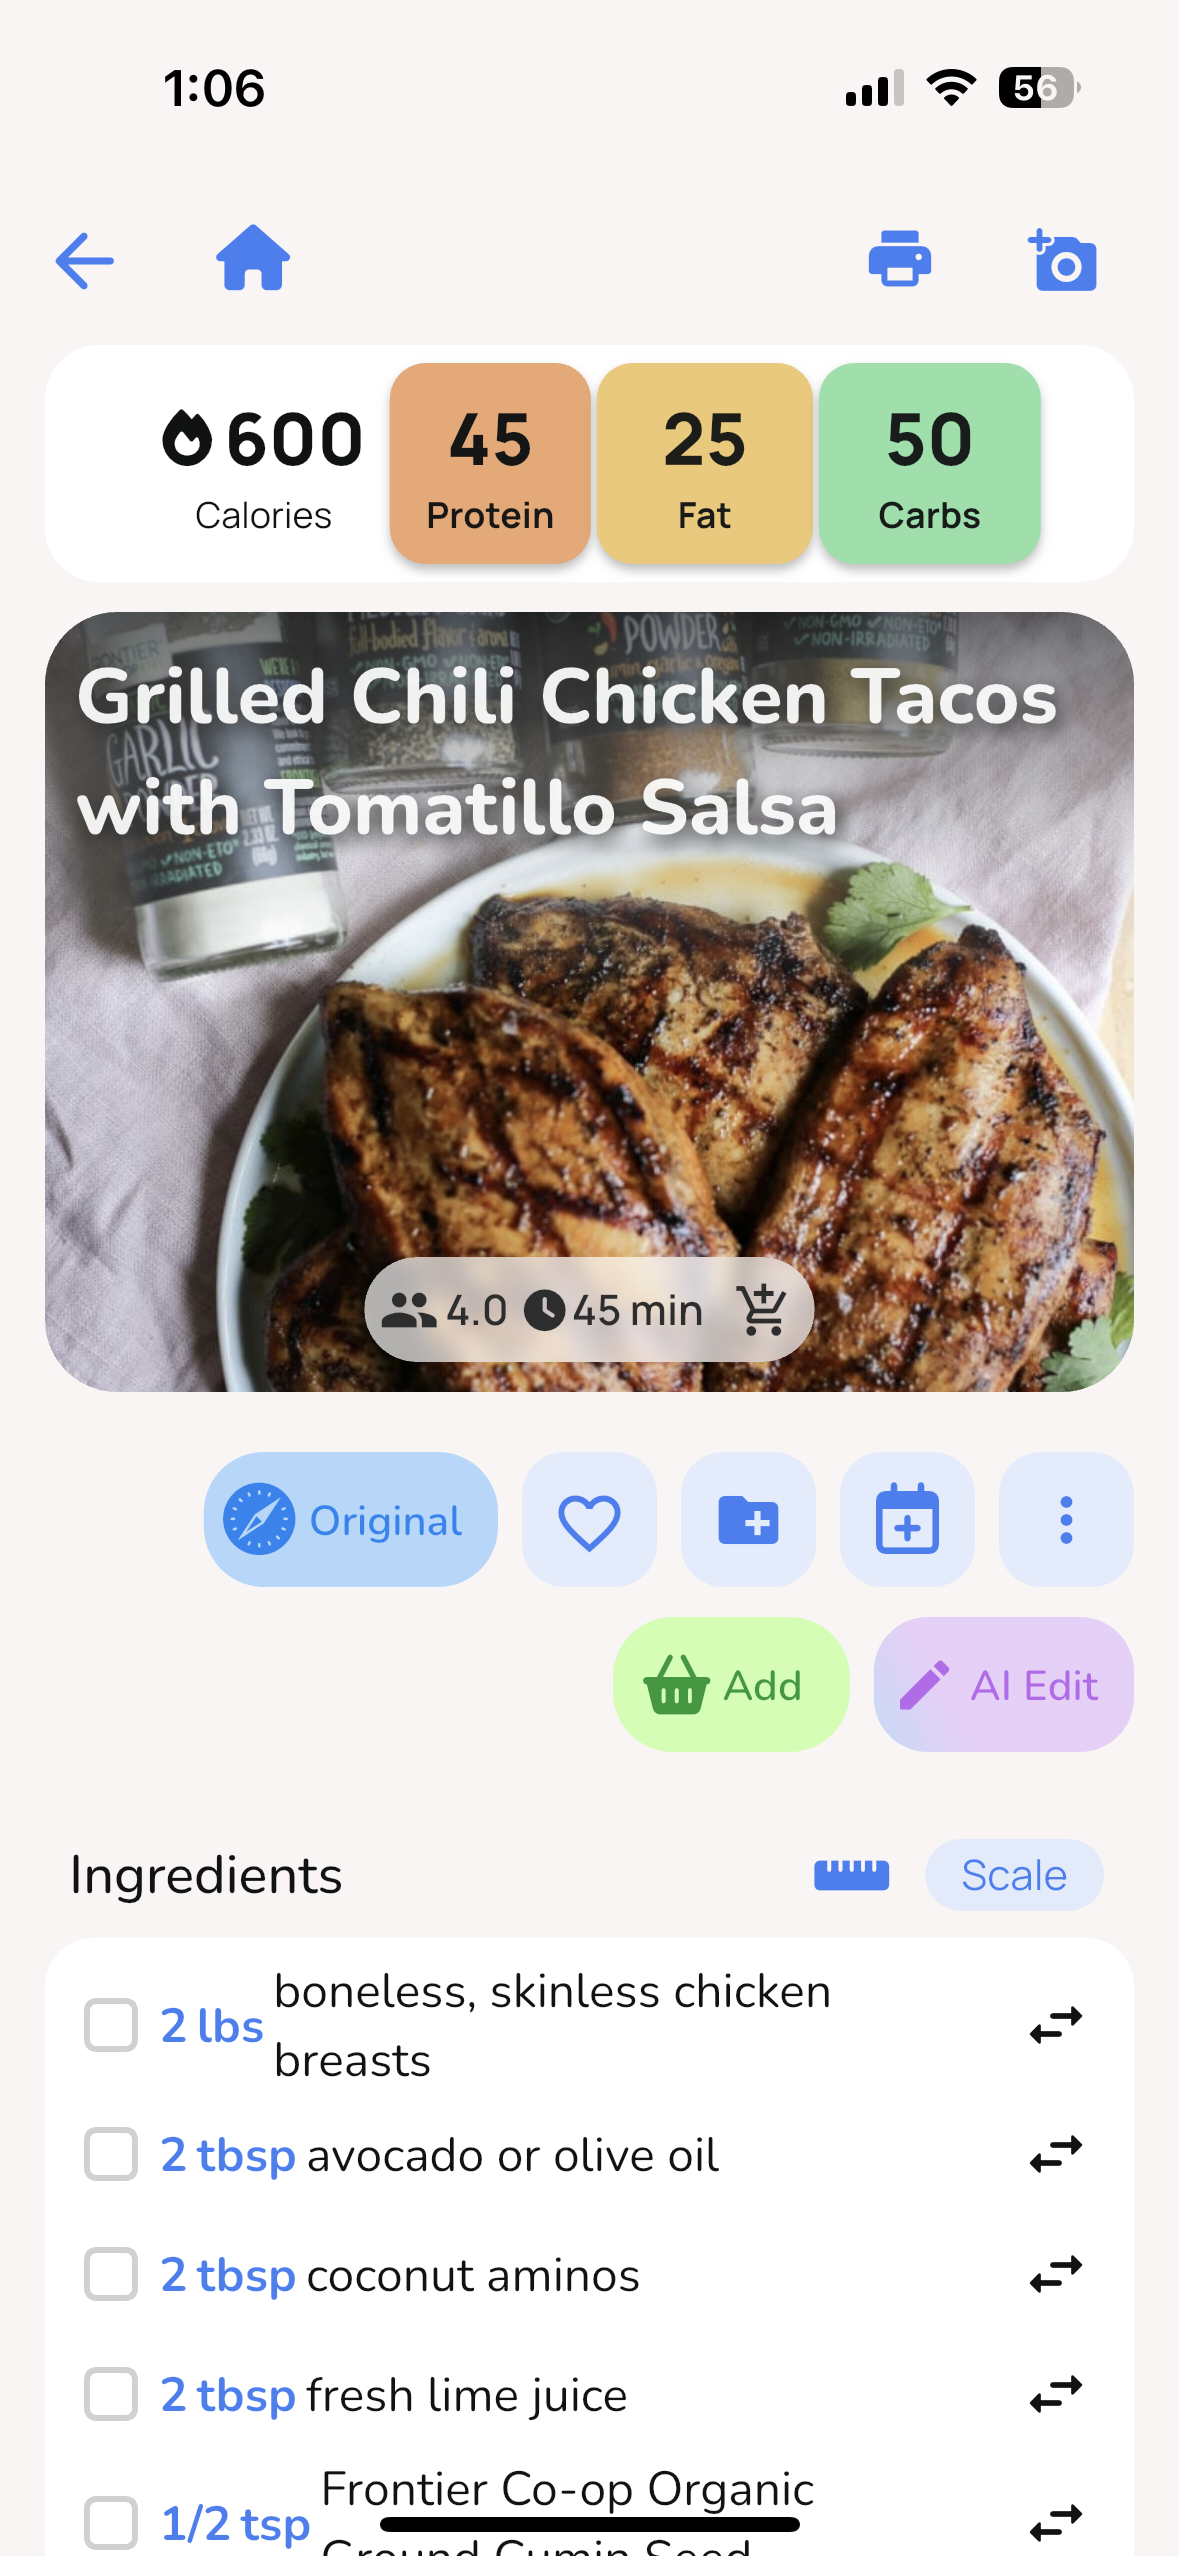
- Organize Recipes: Use tools like Honeydew Recipe Manager to structure ingredients and steps.
- Choose Platforms: Tailor videos for YouTube (16:9), TikTok/Instagram Reels (9:16), or Facebook (1:1).
- Write a Script: Break recipes into clear, step-by-step scenes with sensory details and camera angles.
- Create Videos with AI: Use platforms like Reelmind or Filmora to generate clips based on prompts.
- Edit and Finalize: Review clips for accuracy, add captions, and ensure visual consistency.
AI tools simplify content creation, making it accessible for home cooks and brands alike.
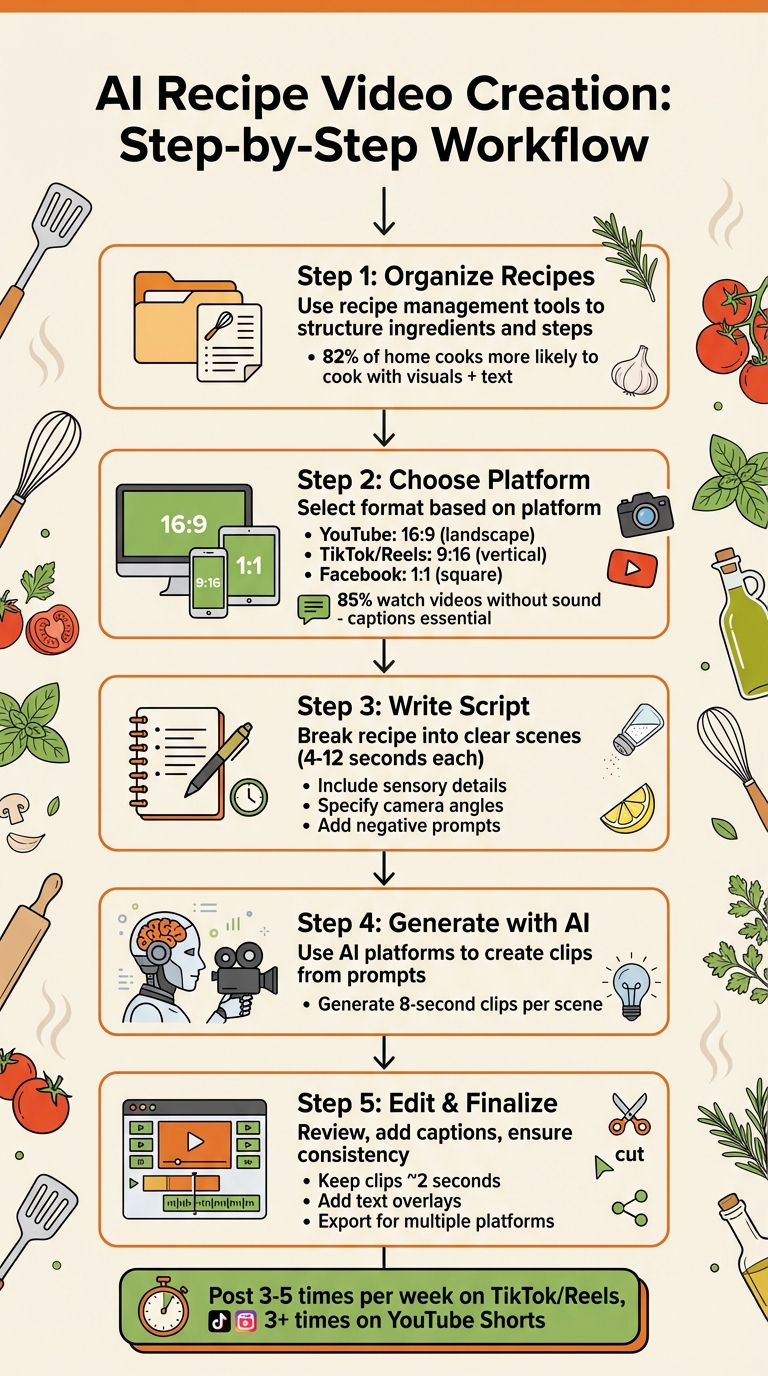
5-Step AI Recipe Video Creation Workflow
Make Viral Recipe Videos with AI in Less Than 3 Minutes
Planning Your Recipe Video
Careful planning can save you a ton of time when creating recipe videos. Before diving in, make sure your recipes are well-organized, you’ve chosen the right platform, and you have a detailed script ready to go. Here’s how to tackle each step.
Organize Recipes with Honeydew Recipe Manager
Keeping your recipes in one spot makes life so much easier. With Honeydew Recipe Manager, you can instantly import recipes from TikTok, Instagram, YouTube, or any website. It automatically organizes ingredients and steps, so you don’t have to spend time reformatting them for AI video tools.
You can access, edit, and back up your recipes on any device. Why does this matter? Research shows that 82% of home cooks are more likely to shop for ingredients and actually cook when recipes include both visuals and text. Clean, well-organized recipes are the backbone of a great video.
Choose Your Target Platform
Deciding where to post your video is just as important as the recipe itself. Each platform has its own video format and audience expectations:
- YouTube: Best for landscape (16:9) videos with detailed, personality-driven content.
- TikTok and Instagram Reels: Focus on vertical (9:16) videos that are quick, trendy, and authentic.
- Facebook: Square (1:1) videos work well here.
As Harry Ovenden from Hatch Agency points out:
"Longer form content on YouTube has room for personality and segues. Whereas shorter form content needs to be concise, snappy and on trend."
Also, keep in mind that about 85% of social media users watch videos without sound. That means captions aren’t just helpful - they’re essential. For TikTok or Reels, hook your audience within the first 3 seconds. On YouTube, you can take a little more time to introduce the recipe and showcase the final dish.
Write a Clear Script
When using AI video tools, vague directions won’t cut it. Break your recipe into clear, step-by-step shots. Each step should be its own scene, lasting 4 to 12 seconds. Be as specific as possible. For example: “Overhead shot of fresh basil being finely chopped on a wooden cutting board with vibrant green leaves.”
Jason Hsiao, Co-Founder of Animoto, sums it up perfectly:
"Creating a video without a script is like baking a cake without a recipe. You can definitely do it, but there's no guarantee it'll be any good."
Start your script with the most visually appealing shot - the finished dish. This grabs attention right away. Then, outline every action: laying out ingredients, chopping, sizzling, simmering, and plating. Use sensory words like “golden-brown,” “velvety,” or “glistening” to help the AI capture textures and details. Don’t forget to include camera angles (overhead, close-up, side view), lighting preferences (natural, warm), and even what to avoid - like “no bruised fruit” or “no dull colors”. The more detailed your script, the better your video will turn out.
Creating Your AI Recipe Video
Once your script and plan are ready, it's time to bring your video to life. Use your AI tool to generate clips based on clear instructions, then review and refine the results. Here's how to turn your script into an engaging video.
Write Effective AI Prompts
Your prompts are the blueprint for your video. As David Allegretti from Envato points out:
"Unlike still images that capture a single moment, video unfolds over time. Your prompts need to choreograph movement, pacing, camera work, and most recently, sound - all while maintaining coherence from start to finish."
Start by defining the visual style. Do you want a cinematic feel with dramatic lighting and smooth camera movements, or a documentary vibe with natural light and handheld shots? Then, get specific about the action. For instance, describe scenes like "mincing garlic on a white ceramic plate" or "folding velvety cake batter with a wooden spoon." Don’t forget the environment - perhaps "a sleek, modern kitchen with stainless steel counters" or "a rustic wooden table bathed in morning sunlight."
Detail the camera angles and movements to guide the AI. Use terms like "overhead shot", "slow push-in", or "low-angle tracking shot." Add sensory details to make the food pop: think "steam rising from bubbling tomato sauce", "glistening red peppers", or "golden-brown crust with visible flakes." If audio is an option, include cues like "sizzling bacon on a cast-iron skillet" or "gentle bubbling of soup."
To avoid unwanted elements, use negative prompts. For example, add tags like "[--no] bruised, rotten, dull colors" to ensure ingredients look fresh and vibrant. Tools such as Envato VideoGen can create 8-second clips from a single prompt, while Filmora's Text to Video tool (powered by Sora 2) offers multi-shot sequencing to maintain consistency across scenes.
Generate the Video
With your detailed prompts ready, generate each scene one at a time. Tailor the aspect ratio to your platform (e.g., 9:16 for TikTok or Instagram Reels, 16:9 for YouTube), and determine the duration - most tools produce clips between 4 and 12 seconds. Adjust the quality settings to match your needs.
Many tools offer specialized models for different visual styles. If one model doesn’t quite capture the glossy sheen of a sauce, try another. For instance, Envato subscribers can generate up to 30 videos per month, giving you room to experiment.
Review and Edit the Output
Carefully review each clip to ensure the visuals are accurate. Ingredients should look fresh, textures should appear realistic, and cooking actions should make sense - like liquids reducing, dough rising, or meat browning.
Maintain visual continuity by ensuring consistent lighting, perspective, and overall aesthetic across clips. Check that the sequence of steps is correct and that no critical actions are skipped or out of order. If something looks off - like a texture that doesn’t seem right - regenerate the clip with a more precise prompt.
Use editing tools to fine-tune the video. Trim unnecessary parts, rearrange scenes for smoother transitions, or extend shots that feel too short. If an element looks out of place, use "Insert" or "Remove" tools to fix it, or reshoot the scene from a different angle. While AI provides a solid starting point, human editing is key to achieving the right pacing and emotional impact.
Once editing is complete, enhance the visuals further and add captions to create a polished, professional final product.
Enhancing and Finalizing Your Video
Add Captions and Visual Elements
Did you know that 85% of online cooking videos are watched without sound? That makes captions a must-have for your video. Use AI tools to transcribe your audio and generate captions, making your content more accessible for silent viewers.
To guide your audience, add text overlays showing step numbers or ingredient measurements, like "Step 2: Sauté for 5 minutes" or "Add 3 Tbsp sugar". Keep it short and sweet - long sentences clutter the screen. You can also include timer-style animations to visually indicate cooking durations, helping viewers stay on track.
Want to make your video stand out? Add branding elements like your logo, consistent fonts, and your signature colors. Start and end with a hero shot of the finished dish - it grabs attention right away and leaves viewers with a satisfying visual. Finally, include call-to-action prompts like "Check out the full recipe on our blog" or "Share this video with a friend" to encourage engagement.
Once your captions and visuals are ready, it’s time to assemble everything into your final video.
Combine Clips into a Final Video
Bring your AI-generated clips together and arrange them in sequence. Keep most clips short - around 2 seconds - unless a longer shot is absolutely necessary. Stick to simple transitions like cross-fades or hard cuts; flashy effects can distract from the recipe.
Don’t forget about audio! Balance the sound levels across all clips to avoid sudden volume changes. Use a fade-out for smoother transitions. If you’re using overhead shots, rotate the footage 180° so that hands naturally appear from the bottom of the screen. To add variety, sprinkle in B-roll footage, like close-ups of sizzling garlic or dough rising - these shots add depth and keep things visually interesting.
After combining your clips, you’re almost ready to publish. Just a few final touches remain.
Prepare for Publishing
Before hitting publish, do a thorough quality check. Make sure your captions are accurate, text overlays are easy to read, and all visuals are aligned properly. Create different versions of your video tailored to specific platforms: 16:9 for YouTube, 1:1 square for Instagram and Facebook, and 9:16 vertical for TikTok and Reels. Pay attention to keeping titles and key visuals centered when resizing.
Consistency is key - check that brightness, contrast, and white balance are uniform across all clips. Use AI tools to clean up your audio by removing filler words like "um" and "ah" for a polished final product. Finally, export high-quality backups to ensure you’re ready for any platform.
With these steps complete, your video is polished and ready to share with the world!
Publishing and Tracking Performance
Optimize for Social Media Platforms
Tailor your videos to fit the unique formats of each platform: use 9:16 for TikTok, Instagram Reels, and YouTube Shorts, and 16:9 for standard YouTube videos. Keep your titles concise - under 60 characters - and place primary keywords at the beginning. For example: "Easy 15-Minute Pasta Recipe".
Grab attention immediately. As Mariam (MJ) Ordubadi, Head of Marketing at Aequilibrium, explains:
"Your video isn't just competing with other content - it's fighting against the scroll reflex".
Experiment with different hooks to draw viewers in. This could be a thought-provoking question, a bold statement, or an instant reveal of the final dish.
When it comes to hashtags, use 3–5 on TikTok, 5–10 on Instagram Reels, and 2–3 on YouTube Shorts. For YouTube, write a detailed description of at least 200 words, incorporating keywords early on, and include time-stamped chapter markers. Posting frequency matters too: aim for 3–5 posts per week on TikTok and Reels, and at least 3 posts per week on YouTube Shorts.
Once your videos are optimized for format and captions, shift your focus to tracking their performance.
Track Video Performance
Keep an eye on metrics like view count, average watch time, and completion rate. Eileen Kwok, Social Media Strategist at Hootsuite, highlights the importance of average watch time:
"Average watch time tells you how long people stick with your video and where you might be losing them. It's one of the clearest signals of content quality".
On Instagram, saves are a strong indicator that viewers found your recipe useful and plan to return to it. On TikTok, focus on average watch time to boost discoverability, while on YouTube, use retention graphs to identify where viewers drop off. For example, if a significant number of people stop watching at the 30-second mark, consider tightening that section or adding a compelling visual element.
Don’t overlook click-through rates (CTR) and conversion rates if your video links to a full recipe or recipe apps for social media imports or encourages newsletter signups. Finally, engage with your audience by responding to comments within the first hour - this can help signal algorithms to promote your content further.
Conclusion
Creating AI-powered recipe videos doesn't have to be complicated. Start by organizing your recipes in one place, then turn the ingredients and steps into detailed visual prompts. Use AI tools to generate video clips, refine the results, and tailor them for your chosen platform. Each step flows into the next, making it easier to produce engaging and polished content. This approach also sets the stage for using tools like Honeydew Recipe Manager to simplify the process.
Honeydew Recipe Manager takes the hassle out of recipe organization. With around 270,000 recipes saved by users every month, its AI-powered extraction ensures your recipes are captured accurately and efficiently. Features like "Ask Honey" let you tweak recipes on the fly - whether you're transforming a pasta dish into a keto-friendly version or adjusting for other dietary preferences - so your AI-generated videos can cater to niche audiences seamlessly.
The app's 4.8/5 rating on the Apple App Store and glowing feedback, like Sarah M.'s testimonial ("Honeydew has transformed the way I cook. I'm saving so much time and enjoying new recipes every week!"), highlight its value. By organizing recipes in seconds, you can focus more on scripting, creating, and polishing your videos. These user experiences show how efficient recipe management can improve every step of the video creation process.
Whether you're a home cook sharing your culinary adventures or a content creator growing your audience, combining smart recipe management with AI video tools makes the journey smoother. By centralizing your recipes, using AI for video generation, and tailoring content for your platform, you can create cooking tutorials that look professional and stand out.
FAQs
How can AI make creating recipe videos faster and easier?
AI tools make creating recipe videos faster and easier by automating many of the tedious tasks involved. They can take written recipes and turn them into step-by-step video tutorials with minimal effort. This eliminates the need for lengthy filming sessions or complex editing. Features like automatic visuals for ingredients, voiceovers, and animations help produce videos that look polished and professional in no time.
These tools also simplify the workflow by letting users import recipes from different sources, adjust the pacing of the video, add narration, and include branding elements. With AI, crafting high-quality cooking content becomes quicker and more approachable, even for beginners.
What are some tips for creating effective AI prompts for recipe video production?
To craft AI prompts for recipe video production that truly hit the mark, focus on being clear, specific, and detailed. Lay out exactly what you want in terms of visual style, tone, and key actions. Think about elements like camera angles, lighting setups, transitions, and any standout features that will make the video pop.
For example, if you're working on a cooking tutorial, use descriptive language to guide the AI. Request close-ups for key moments like chopping vegetables or mixing ingredients. Specify how you want important steps to be highlighted - whether through slow-motion shots, text overlays, or particular lighting effects. The more precise and vivid your instructions, the better the AI can interpret your vision and create a polished, engaging video. This level of detail helps ensure the final product not only grabs attention but also keeps your audience informed and entertained.
Why should recipe videos be customized for different social media platforms?
Customizing recipe videos for different social media platforms is key to connecting with diverse audiences. Each platform has its own style, preferred video formats, and ways users engage with content. For instance, quick, eye-catching clips tend to thrive on Instagram and TikTok, while platforms like YouTube are better suited for longer, in-depth tutorials.
By adjusting your content to suit the platform, you can grab attention, boost engagement, and encourage actions like likes, shares, and comments. This strategy not only helps your videos stand out but also keeps viewers coming back for more.