How to Disinfect Containers Without Harsh Chemicals
• Updated
Want a cleaner kitchen without toxic chemicals? You can safely disinfect your containers using natural, everyday items like vinegar, baking soda, and lemon juice. These methods eliminate bacteria, odors, and stains without damaging materials or leaving harmful residues. Here's a quick overview:
- Why Avoid Chemical Cleaners: They can corrode metal, degrade plastics, and leave harmful residues or artificial smells.
- Preparation Tips: Remove labels, check for cracks, and clean each part of your container thoroughly.
- Natural Cleaning Methods:
- Vinegar Solution: Mix equal parts vinegar and hot water to disinfect and deodorize.
- Baking Soda Paste: Use for tough stains and odors.
- Steam/Boiling Water: Ideal for glass and metal containers.
- Lemon Juice & Sunlight: Perfect for odor removal and light cleaning.
Pro Tip: For plastic containers, avoid high heat and rinse with cold water first to prevent stains or warping. Always air-dry containers with lids off to avoid moisture buildup.
Switching to natural cleaning solutions is safer, cost-effective, and better for your containers. Ready to learn how? Let’s dive in.
Vinegar Cleaning Recipe | All-Natural Disinfectant Cleaner
Preparing Containers for Cleaning
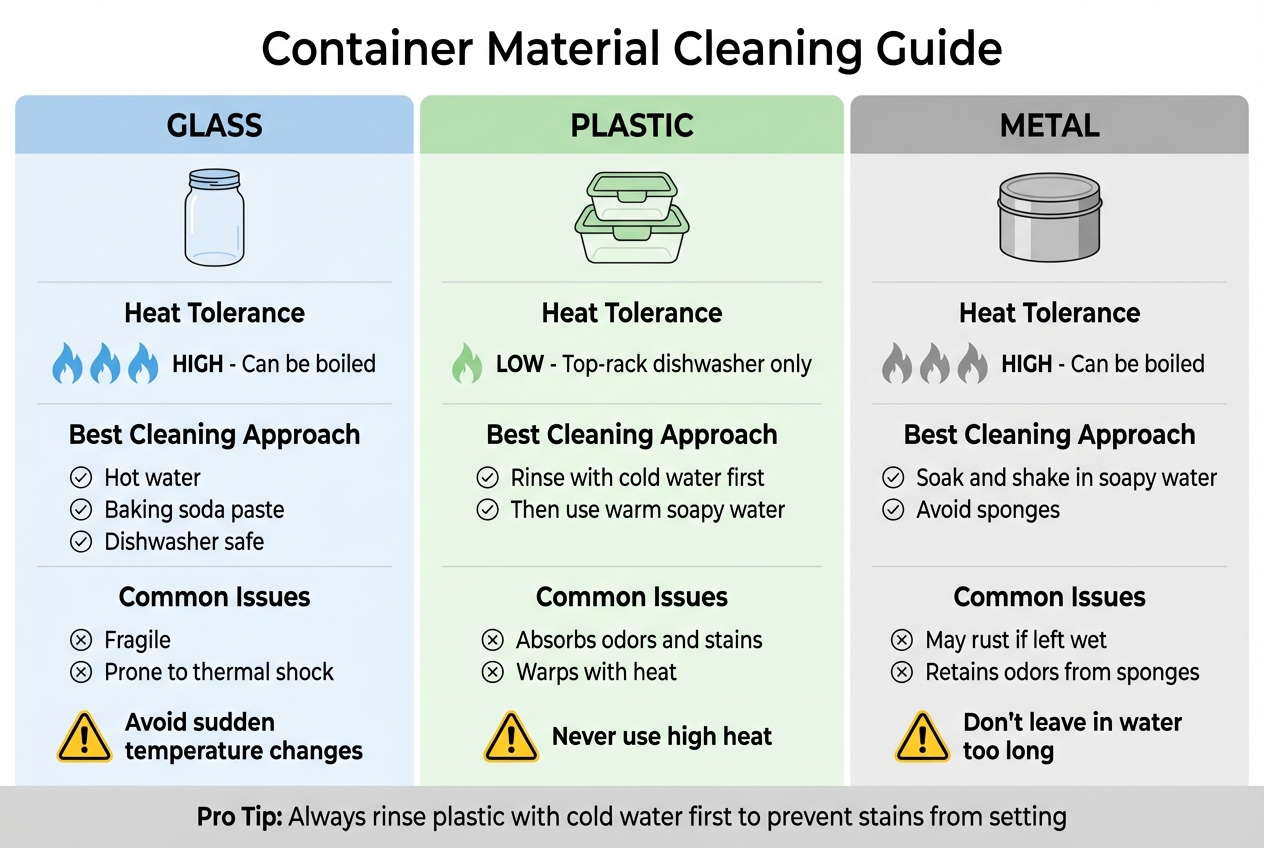
Container Material Cleaning Guide: Heat Tolerance and Best Practices
To ensure your containers are spotless, start by taking them apart to clean every nook and cranny thoroughly. This means removing lids, gaskets, and silicone seals - anywhere bacteria might hide. While you're at it, check plastic containers for scratches or cracks, as these can trap bacteria. If you spot damage, it's safer to replace the container rather than risk food contamination .
Once disassembled and inspected, you can optimize your ingredient prep by removing labels and assessing the material of your containers.
Remove Labels and Sticky Residue
Labels and adhesive residue can block cleaning solutions from properly reaching the container's surface. Thankfully, you don’t need harsh chemicals to deal with them. The trick is to match the solvent to the type of adhesive. For example, water-based adhesives (common on jam jars) dissolve in hot soapy water, while oil-based adhesives respond better to oil-based solutions.
For paper labels, soak the container in hot soapy water mixed with ½ cup of baking soda for about 30 minutes. If sticky residue lingers, mix equal parts baking soda and a cooking oil like olive, coconut, or vegetable oil to create a paste. Let it sit on the residue for 15–30 minutes, then gently scrub with a non-scratch sponge.
"To defeat a non-polar adhesive, you need a non-polar solvent... things like cooking oil, mineral spirits, and acetone are all non-polar or have non-polar characteristics, making them perfect for this job." - Silas, Founder, Flavor365
If the label still refuses to come off, try applying heat with a hairdryer for about 45–60 seconds. This softens the adhesive, making it easier to peel the label off in one piece. Avoid putting labeled jars in the dishwasher, as the paper can clog filters and melted adhesive might stick to your dishes. When scraping off stubborn residue, use plastic tools like an old credit card or a plastic scraper to prevent scratching.
Identify Your Container Material
Knowing what your container is made of helps you choose the safest and most effective cleaning method. Each material requires specific care. For instance, glass can handle high heat and boiling water but is prone to cracking from sudden temperature changes. Avoid plunging a hot glass jar into cold water. Plastic, on the other hand, can warp or melt under high heat, so it’s best to rinse it with cold water first and place it on the top rack of the dishwasher if it’s labeled as dishwasher safe . Metal containers can rust if left in water too long. Instead of using a sponge (which can transfer odors), fill them with soapy water and shake vigorously to clean.
| Material | Heat Tolerance | Best Cleaning Approach | Common Issues |
|---|---|---|---|
| Glass | High; can be boiled | Hot water, baking soda paste, dishwasher safe | Fragile; prone to thermal shock |
| Plastic | Low; top-rack dishwasher only | Rinse with cold water, then use warm soapy water | Absorbs odors and stains; warps with heat |
| Metal | High; can be boiled | Soak and shake in soapy water | May rust; retains odors from sponges |
When cleaning plastic containers, start with cold water. Hot water can cause grease, stains, and odors to set into the material. Look for "dishwasher safe" labels or check the recycling codes to confirm the best cleaning methods. Once you've removed the labels, identified the material, and given the container an initial wash, it's ready for the next step: natural disinfection techniques.
Natural Disinfection Methods
Once you've removed labels and identified the materials of your containers as part of your pantry tracking, it's time to disinfect them naturally. These methods clean effectively without leaving behind harmful residues.
Vinegar Solution Method
Distilled white vinegar is a budget-friendly and effective way to disinfect containers. Mix equal parts of distilled white vinegar and hot (not boiling) water for a simple cleaning solution. With its 4%–6% acetic acid content and a pH of around 2.4, household vinegar is known for its disinfecting properties.
"Vinegar does have disinfectant activity. Vinegar is acetic acid, which has the ability to destroy bacteria and viruses." - Dr. Alan Taege, Infectious Disease Expert, Cleveland Clinic
To use, fully submerge your containers and lids in the solution. Let them soak for 15–30 minutes, or up to an hour for tough stains or lingering odors. After soaking, scrub with a non-abrasive sponge, rinse thoroughly under warm water, and air-dry upside down with the lids removed. Don't worry about the vinegar smell - it usually disappears within minutes.
Important: Never mix vinegar with bleach or hydrogen peroxide. Combining them can release toxic chlorine gas or create corrosive peracetic acid.
For additional cleaning power, baking soda can help tackle grime and odors naturally.
Baking Soda Paste or Soak
Baking soda is a gentle yet effective cleaner that removes grime and neutralizes odors without damaging your containers. Sprinkle baking soda inside the container, and for an extra boost, add a splash of vinegar to create a fizzing reaction that loosens debris. Then, add warm water and let it soak for about 30 minutes. For stubborn stains or strong odors, leave the solution to sit overnight.
After soaking, scrub the container thoroughly, paying close attention to seals and lid tracks. Rinse several times with warm water to remove any remaining residue, and air-dry the containers upside down with their lids off.
Steam and Boiling Water Techniques
Heat-based disinfection is another reliable option. Moist heat works by breaking down the enzymes and structural proteins of microorganisms, making it an effective sterilization method.
"Of all the methods available for sterilization, moist heat in the form of saturated steam under pressure is the most widely used and the most dependable." - CDC
For glass and metal containers, submerge them in water heated to at least 176°F (80°C). Start by pre-cleaning the containers with soap and water to remove any debris that could block the heat from reaching germs. If you're sterilizing glass, heat it gradually to avoid cracking due to thermal shock. Keep in mind that repeated exposure to steam may lead to corrosion on metal surfaces.
Avoid boiling plastic containers, as the heat can warp or melt them. Instead, stick to the vinegar or baking soda methods for cleaning plastics effectively.
Tips for Keeping Containers Odor-Free
Plastic containers are notorious for holding onto food odors because their porous material absorbs oils and spices. Even a thorough rinse often isn't enough to completely eliminate smells. To keep your containers fresh, a few simple practices can make a big difference.
Store with Baking Soda
Baking soda is a powerhouse when it comes to neutralizing odors. Instead of just masking smells, it actually breaks down the molecules causing them. A practical tip? Keep an open box of baking soda in the cabinet where you store your containers. This helps absorb any ambient odors and keeps the area smelling fresh.
"The easiest way to keep food storage containers fresh while they bide their time in your cabinet is to store them with a box of open baking soda." - Kirsten Horton, Creator, Organized Charm
If your containers already have a lingering smell, sprinkle 1/4 cup of dry baking soda inside, seal the container, and let it sit for 24 hours before washing. For tougher odors, mix baking soda with water to create a paste, spread it on the interior, and leave it for one to two days before cleaning.
Organize Your Batch Cooking and Storage
Beyond odor control, keeping your containers fresh is easier with smart meal planning. Prolonged storage of leftovers can lead to stubborn odors, so regular use is key. Tools like the Honeydew Recipe Manager (https://honeydewcook.com) simplify weekly meal prep by importing recipes, creating grocery lists, and encouraging consistent container turnover. This not only keeps your kitchen organized but also supports a healthier, more sustainable approach to food storage.
Conclusion
Key Takeaways
You don’t need harsh chemicals or pricey cleaners to disinfect your food storage containers. Everyday items like white vinegar, baking soda, lemon juice, and boiling water can handle the job. These natural solutions are effective at removing stains, eliminating odors, and killing germs - all without leaving behind harmful residues. For instance, hydrogen peroxide safely breaks down into water and oxygen, leaving no chemical traces on surfaces that come into contact with food. These options are safer, budget-friendly, and better for the environment.
Understanding your container material is key to choosing the right disinfectant. Start by rinsing containers with cold water to avoid setting stains. Then, apply your natural disinfectant of choice. Always let containers air-dry completely with lids off to prevent moisture buildup and unpleasant smells. For frequently used containers, aim to sanitize them at least once a week. For those used less often, a deep clean once a month should suffice.
Incorporating these practices can simplify and improve your daily meal prep routine.
Next Steps for Better Meal Prep
Clean containers are the backbone of an organized kitchen. By adopting these natural cleaning methods, you’ll reduce residue buildup and maintain a hygienic space. It’s also important to routinely check your containers for cracks or wear and replace them if they’re no longer in good condition.
To keep things running smoothly, streamline your meal prep process to ensure regular container use and prevent lingering odors. Tools like Honeydew Recipe Manager (https://honeydewcook.com) can help you plan weekly meals, save recipes from social media, and create instant grocery lists, encouraging consistent rotation of your containers. By combining natural cleaning techniques with regular maintenance, you can create a safer and more efficient kitchen environment.
FAQs
What is the best way to disinfect plastic containers?
Using natural, non-toxic solutions is a great approach to disinfecting plastic containers. A mixture of warm water, baking soda, and white vinegar can do wonders - it cleans, removes odors, and disinfects all at once. Simply soak the containers in this solution for a thorough clean.
For microwave-safe plastics, steam sterilization is another option. However, the vinegar and baking soda method stands out as a safer and more versatile choice for most types of plastic containers.
How long should I soak containers in vinegar?
To clean and tackle stains, pour white vinegar into the container until it’s about one-fifth full, then top it off with water. Let the mixture sit overnight. This approach also works well to get rid of unpleasant odors. Make sure the container is completely immersed in the vinegar-water solution for optimal results.
How often should I sanitize food containers?
Keeping food containers clean after each use is essential for both safety and freshness. Regular cleaning helps stop bacteria from growing and prevents cross-contamination, especially when dealing with perishable items. For a deeper clean, you can try natural options like vinegar or baking soda. If you prefer a chemical approach, diluted bleach works well. The most important thing? Stick to cleaning them every time you use them to ensure they stay hygienic.