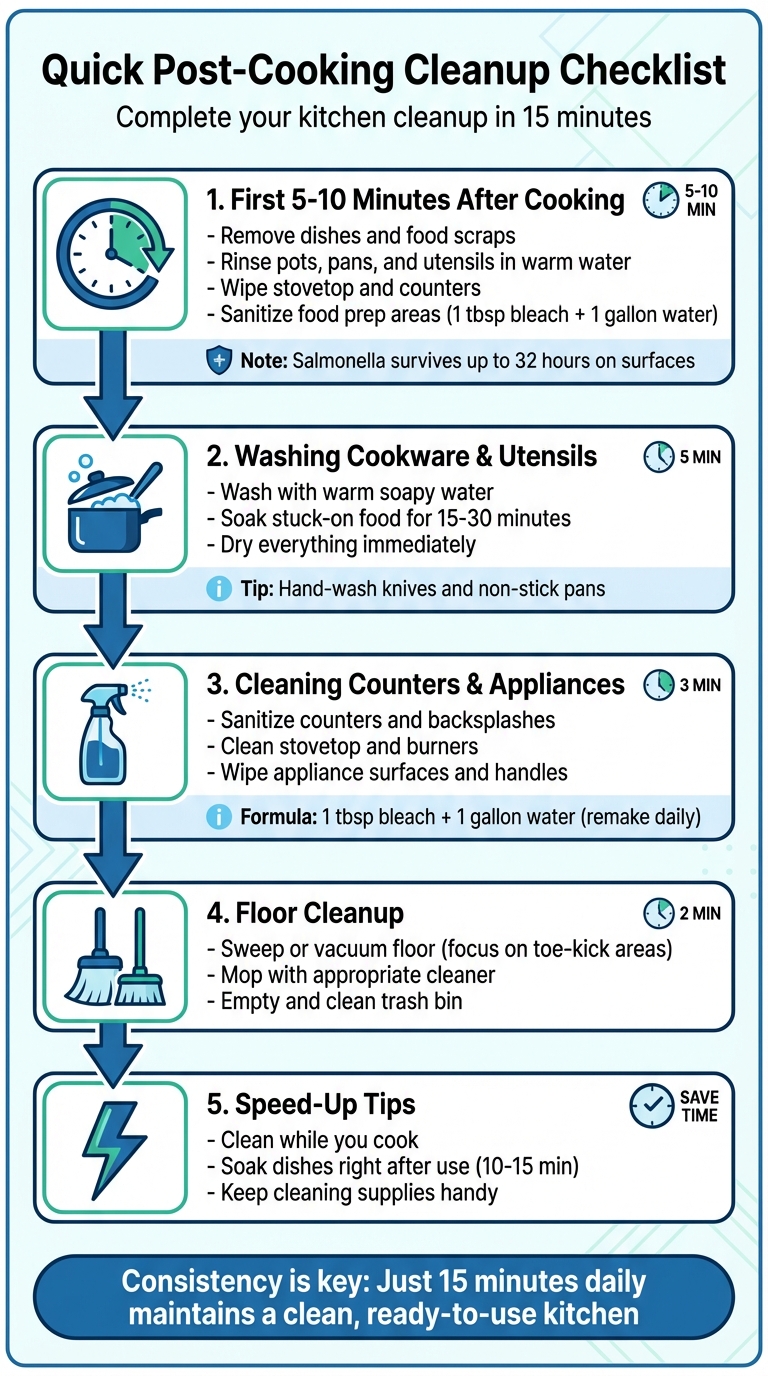
Quick Checklist for Post-Cooking Cleanup
• Updated
Hate cleaning up after cooking? Here's how to make it simple and fast:
- Start immediately: Tackle dishes, spills, and food scraps right after cooking to prevent hard-to-clean messes and bacteria growth.
- Rinse and soak: Pre-soak cookware and utensils in warm, soapy water to loosen stuck-on food.
- Sanitize surfaces: Use a bleach solution to kill bacteria, especially in areas that touched raw meat.
- Clean as you cook: Wash prep tools, wipe counters, and manage scraps during downtime while cooking.
- Handle floors and trash last: Sweep, mop, and disinfect trash bins to finish strong.
Consistency is key - spend just 15 minutes daily to maintain a clean, ready-to-use kitchen.
Post-Cooking Kitchen Cleanup Process: 5-Step Guide
Clean with Me! | Tips For Cleaning After Meal Prep
First 5-10 Minutes After Cooking
Jump into action right after cooking to stop food residue from hardening and to curb bacteria growth. Tackling cleanup during this brief window not only saves you from tougher scrubbing later but also helps keep your kitchen hygienic. Begin by clearing away dishes and food scraps to set the stage for efficient cleaning.
Remove Dishes and Food Scraps
Start by gathering all the dirty dishes in one spot. Store any leftovers in airtight containers to keep them fresh, and use a plastic grocery bag as a makeshift "counter trash" bin for food scraps. This trick minimizes mess and makes trips to the trash can less of a hassle.
Rinse Pots, Pans, and Utensils
Rinse and pre-soak cookware and utensils right away to stop food from drying and sticking. Scrape off any leftover food, then rinse items with warm water. When possible, soak pots, pans, and dishes in hot, soapy water. For silverware, submerge them in a bowl of water to keep them free from debris.
Wipe the Stovetop and Counters
Address spills immediately by wiping them down with a damp cloth. Focus on the stovetop, countertops, and frequently touched areas like faucet handles and appliance buttons.
Sanitize Food Prep Areas
After cleaning, sanitize surfaces, especially those exposed to raw meat. Meredith Carothers, a Technical Information Specialist at the USDA, emphasizes the importance of this step:
Cleaning with warm, soapy water can physically remove dirt, grime, and some bacteria from a surface, but it does NOT kill bacteria.
To sanitize, mix 1 tablespoon of unscented bleach with 1 gallon of water. Apply the solution to surfaces, let it sit for several minutes, and allow them to air dry. This is essential since harmful bacteria like Salmonella can survive on kitchen surfaces for up to 32 hours, and Campylobacter can linger for up to 4 hours. Use paper towels to clean up raw meat juices to avoid spreading bacteria with reusable cloths.
Washing Cookware and Utensils
Once the quick cleanup is done, it's time to give your cookware and utensils a thorough wash to get rid of any leftover residue. If you've pre-soaked your items, you're already a step ahead. For anything that's not dishwasher safe - like non-stick pans and kitchen knives - stick to handwashing. This keeps non-stick coatings intact and prevents damage to knife blades. Use warm or hot soapy water for everything, and don't forget to clean the outsides and bottoms of pots and pans to tackle any grease buildup.
Wash Items with Warm Soapy Water
Start by filling the sink with warm, soapy water. Scrub your pans, utensils, and glassware using a non-abrasive scrubber or a microfiber cloth. These are gentle enough to avoid scratching your cookware while still being effective at removing stuck-on food. Save kitchen knives for last, and wash them carefully by hand under running water. This not only protects the blades but also helps prevent accidental cuts. For blenders, disassemble the blade and gasket after each use so you can clean every part with hot soapy water.
Soak and Scrub Stuck-On Food
For cookware with stubborn, burnt-on food, fill the item with hot soapy water and let it soak for 15 to 30 minutes. If soaking doesn't do the trick, mix baking soda with water to create a paste. Apply it to the scorched areas and let it sit for several hours or even overnight. For extremely tough residue, you can fill the pan with water and dish soap, bring it to a boil, and let it simmer for a few minutes. Afterward, gently scrape the residue off with a spatula.
Dry Everything Right Away
To prevent moisture-related issues, dry everything immediately after washing. Use a microfiber cloth or dish towel to hand-dry your cookware and utensils, and take a moment to wipe down nearby surfaces as well. As Food Smart Colorado points out:
Moisture is bacteria's best friend.
For cutting boards, stand them upright to ensure they dry completely, which helps to prevent mold from forming.
Cleaning Counters, Appliances, and Surfaces
Once your cookware is dry, it’s time to give your countertops and appliances a thorough cleaning. This step wraps up your mid-kitchen cleanup, leaving only the floors to tackle. While food prep areas may have already been sanitized earlier, now it’s about focusing on every cooking surface. This isn’t just about wiping away crumbs - it’s about ensuring bacteria are eliminated. Alicia Chilton and Jessica Bennett from Better Homes & Gardens emphasize:
"Cleaning with warm, soapy water does not kill bacteria. To help remove bacteria and reduce the number of pathogens in the kitchen, you have to sanitize your surfaces."
Sanitize Counters and Backsplashes
Start by washing your counters with hot, soapy water to clear away grease and food particles. Follow up immediately with a sanitizer. This two-step approach ensures thorough disinfection. A simple DIY sanitizer mix is 1 tablespoon of unscented liquid bleach combined with 1 gallon of cool water (avoid hot water, as it deactivates bleach). Apply the solution, let it air dry, and remember to make a fresh batch daily since its effectiveness diminishes after 24 hours.
Keep in mind: natural stone surfaces like granite or marble need pH-neutral cleaners, as bleach and vinegar can cause damage. For stubborn splatters on backsplashes, a kitchen degreaser can work wonders before you sanitize.
Clean the Stovetop and Burners
For stovetops, remove burner grates and soak them in hot, soapy water or a degreaser while you clean the surface. If you’re dealing with baked-on grease, try a mixture of 1 part vinegar, 2 parts baking soda, and a few drops of dish soap. Let it sit for 20 minutes, then scrub with a non-abrasive sponge.
Gas stove owners can use a paper clip or safety pin to gently clear any clogs in the ignition ports or burner holes. For glass cooktops, sprinkle baking soda and vinegar over the surface, then cover with a towel soaked in hot, soapy water. Let it sit for 15 minutes to loosen burnt-on food before wiping it clean.
Wipe Appliance Surfaces
Don’t forget to clean high-touch areas like refrigerator handles, microwave doors, stove knobs, and light switches to minimize bacteria buildup. Use a damp microfiber cloth and an all-purpose cleaner for appliance surfaces. For microwaves, heat a bowl of water with vinegar and lemon slices for 5–8 minutes. Let it sit for 2 minutes, then wipe the interior and wash the turntable separately in warm, soapy water.
For stainless steel appliances, finish with a dedicated polish to remove fingerprints and restore their shine.
With your counters, appliances, and surfaces spotless, you’re ready to move on to cleaning the floors for a completely refreshed kitchen.
Floor Cleanup and Finishing Steps
Even if your counters are sparkling clean, the floor might still be hiding crumbs, grease, or food particles. After you've tackled the surfaces, shift your focus to the floor and trash to wrap up your cleanup routine. The best approach? Work step-by-step: sweep first, mop second, and finish by cleaning out the trash bin.
Sweep or Vacuum the Floor
Start by sweeping up large debris, especially in those tricky spots like the toe-kick areas under cabinets. As Shifrah Combiths from Apartment Therapy points out:
Sweep with a broom to pick up all the larger crumbs and debris that end up on the kitchen floor, especially near your cabinet toe kicks.
For stubborn particles lodged in tight spaces between appliances and countertops, grab a pan scraper or even an old credit card to loosen them. To get an even deeper clean, follow up with a vacuum designed for hard floors to catch any fine dust or crumbs your broom might have missed. Don’t forget to sweep or vacuum under the refrigerator and oven fronts - these areas are magnets for hidden debris. If you spot any spills, wipe them up first to avoid spreading the mess or damaging your vacuum.
Mop the Kitchen Floor
With the loose dirt out of the way, it’s time to mop. Most households stick to weekly mopping, but if you have pets, kids, or a busy kitchen, you might need to do it more often. Choose a cleaner that matches your flooring type to avoid any damage. For everyday cleaning, a mix of water and multi-purpose cleaner works well. If grease is a problem, a degreaser can help break it down. Remember, even if the floor looks clean, bacteria like Salmonella can linger on surfaces for up to 32 hours.
Empty and Clean the Trash Bin
Taking out the trash isn’t just about removing garbage - it’s also about keeping odors and bacteria at bay. Empty your trash and recycling bins daily, then wipe down the interior, exterior, lid, and handles with a disinfectant. Once a month, give your bin a deeper clean by vacuuming out crumbs and scrubbing it with a bleach solution (mix 1 tablespoon of bleach with 24 ounces of water). For a natural way to fight odors, try a simple DIY deodorizer: combine ½ cup of baking soda with 5 to 10 drops of lavender essential oil. Sprinkle it in the bottom of the bin, let it sit for 30 minutes, then vacuum or wipe it out. Be sure to let the bin dry completely before adding a new liner to avoid trapping moisture, which can lead to bad smells or mold growth.
Tips to Speed Up Your Cleanup
Want to make post-cooking cleanup a breeze? By adopting a few smart habits while you cook, you can turn a long scrubbing session into a quick and easy task.
Clean While You Cook
Staying on top of the mess as you cook can save you a ton of time later. Start by clearing your sink and emptying the dishwasher before you begin. This gives you a ready spot for dirty dishes and utensils. Keep a dedicated "garbage bowl" on the counter for food scraps and packaging - this minimizes trips to the trash and keeps your workspace tidy. Pastry Chef Caroline Schiff highlights the value of staying organized while cooking:
The process of mise en place, which is a restaurant standard practice, keeps you neat and organized as you work. This approach streamlines the entire cleaning process.
Take advantage of downtime while your food cooks - wash prep tools, wipe down counters, and sweep away crumbs with a bench scraper. Speaking of bench scrapers, Schiff also shares her go-to tip:
The bench scraper is the useful tool of my prep and cooking zone. It's helpful for picking up your odds and ends [like] vegetable scraps and getting them neatly into the compost bin.
Another hack? Line baking sheets with parchment paper or foil. These liners catch grease and burnt bits, and when you're done, cleaning up is as simple as tossing them in the trash.
Soak Dishes Right After Use
Don't let food residue harden - it only makes scrubbing harder. Drop dirty pans and utensils into warm, soapy water as soon as you're done with them. For tougher messes, like burnt cheese or sticky sauces, let them soak for 10 to 15 minutes. This softens the residue, making it much easier to clean. Dish soap works to break down grease while the water loosens stuck-on bits. And here's a safety tip: wash sharp knives by hand instead of tossing them into a sinkful of soapy water where they can be hard to spot.
Keep Cleaning Supplies Handy
Having your cleaning essentials within arm’s reach keeps you on top of messes. As editors at Better Homes & Gardens suggest:
To make ticking off your kitchen cleaning checklist easier, keep a spray bottle of your favorite homemade cleaner, or an all-purpose cleaner, handy for quick and efficient cleanup.
Store sponges, dish soap, and microfiber cloths near the sink so you can tackle spills and splatters right away. A small caddy under the sink stocked with baking soda, white vinegar, and a nylon scrub brush can handle most messes without the need for harsh chemicals. Keeping these tools close ensures your kitchen stays neat and organized without much effort.
Conclusion
Keeping your kitchen spotless doesn’t have to be an overwhelming chore. A structured cleanup routine can make all the difference. By breaking post-cooking tasks into simple steps - like rinsing dishes right away, wiping down surfaces, and sweeping the floor - you can stop small messes from turning into larger ones. As the editors of Better Homes & Gardens put it:
A list of small tasks makes it easy for you to keep up with cleaning rather than trying to tackle weeks' worth of built-up grime at once.
The key is consistency, not perfection. A quick 15-minute daily cleanup can be enough to maintain a clean kitchen, especially once it becomes a habit. This not only keeps your space looking great but also promotes food safety and spares you the stress of waking up to a pile of dirty dishes.
Smart planning is another way to minimize kitchen chaos. Planning meals ahead of time - knowing your ingredients, recipes, and prep steps - can make cooking smoother and cleanup faster. Tools like Honeydew Recipe Manager simplify the process by allowing you to import recipes, create grocery lists, and organize weekly meals with AI assistance.
Save or print this checklist as a handy guide to maintain a clean, ready-to-use kitchen. Build these habits into your routine, and every meal will end with a space that’s prepped for your next culinary creation.
FAQs
Why is it a good idea to clean as you cook?
Cleaning as you cook comes with plenty of perks that can make your kitchen time much smoother. For starters, it keeps your workspace tidy and clutter-free, which means you can quickly grab what you need and stay focused on your recipe. Plus, it cuts down on the mountain of cleanup waiting for you when the cooking’s done.
It’s not just about convenience, though. Cleaning as you go also boosts kitchen safety by reducing hazards like slippery spills or cluttered countertops that could lead to accidents. On top of that, it helps maintain good hygiene by lowering the chances of cross-contamination, especially when working with raw ingredients. Making this a habit can transform cooking into a more efficient and stress-free activity!
What’s the best way to sanitize kitchen surfaces after cooking?
To keep your kitchen surfaces safe and hygienic, start by cleaning them with soap and warm water. This step removes dirt, grease, and leftover food particles. Once the surface is clean, follow up with a sanitizing solution. You can use diluted bleach (mix 1 tablespoon with 1 gallon of water), hydrogen peroxide, or white vinegar. Let the solution sit for at least one minute before wiping it off with a clean towel or letting it air dry.
This two-step routine is especially critical when handling raw meat, poultry, or seafood. It helps reduce harmful bacteria like Salmonella and E. coli, lowering the risk of cross-contamination. Regular sanitizing ensures your kitchen stays a safe place to prepare meals.
How can I clean cookware with stubborn, burnt-on food?
To deal with stubborn, burnt-on food in your cookware, you don’t need fancy products - just a few pantry staples. Start by adding a bit of water and white vinegar to the pan, then bring it to a boil. Once it’s off the heat, sprinkle in some baking soda. Let the mixture sit for a few minutes, allowing the vinegar to break down the residue while the baking soda provides gentle scrubbing power. After that, you can clean the pan with minimal effort.
If you’re short on time, boiling plain water in the pan can help soften the burnt bits. For cast iron, skip the harsh scrubbing entirely. Instead, heat some warm water in the pan to loosen debris without harming the seasoning. Always let cookware cool completely before cleaning, and avoid abrasive tools or harsh chemicals on non-stick surfaces to keep them intact. These straightforward methods not only make cleanup a breeze but also help extend the life of your cookware.