Sensor Calibration Tips for Home Cooks
• Updated
Your kitchen thermometer might be lying to you. Even minor inaccuracies can ruin your meals or compromise food safety. Misreading chicken at 160°F instead of 165°F could leave harmful bacteria, while a 2°F error can derail tasks like tempering chocolate. Here’s what you need to know:
- Why calibrate? Thermometers lose accuracy over time due to drops, extreme temperatures, or regular use. Accurate readings ensure safe cooking and better results.
- Two easy methods: Use an ice bath (32°F) or boiling water (adjusted for altitude) to test your thermometer. Both take under 5 minutes.
- How often? Calibrate every 6 months, or more frequently if you cook daily or notice issues.
- Common mistakes: Shallow probe immersion, skipping altitude adjustments, and rushing stabilization can lead to errors.
Proper calibration is quick and ensures your thermometer works as intended, making your kitchen safer and your meals more consistent.
How to Calibrate Your Digital Instant-Read Thermometer
Two Main Calibration Methods
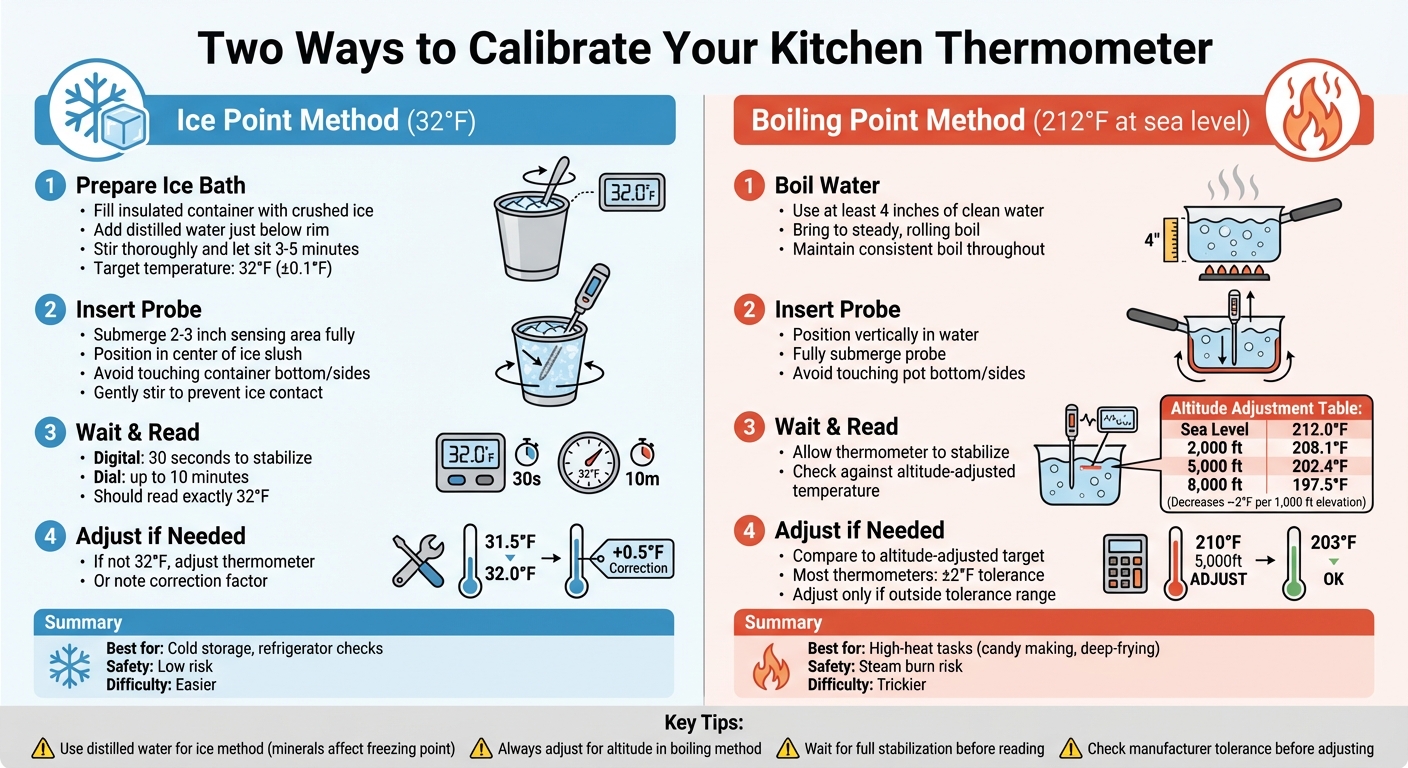
Step-by-Step Guide to Calibrating Kitchen Thermometers Using Ice Bath and Boiling Water Methods
To ensure your thermometer is accurate, you can use either the ice point method or the boiling point method. Both rely on water at specific temperatures as reference points, but they focus on opposite ends of the temperature spectrum. The ice point method uses freezing water, which is always 32°F, while the boiling point method uses water at its boiling temperature, which varies depending on altitude. At sea level, water boils at 212°F, but this decreases as elevation increases.
Most people find the ice point method easier and safer. As ThermoWorks points out, "Boiling point calibration tests are trickier than ice bath tests and are unnecessary if an ice bath test proves conclusive". Plus, you avoid the risk of steam burns. When choosing a method, consider how you’ll use your thermometer: the ice point method works well for cold storage or refrigerator checks, while the boiling point method is better for high-heat tasks like candy making or deep-frying. Proper calibration ensures your thermometer provides accurate readings, which is essential for safe cooking and reducing food waste through better meal preparation.
Ice Point Method
Start by filling an insulated container with crushed ice, then add distilled water until it’s just below the rim. Stir the mixture thoroughly and let it sit for 3 to 5 minutes to stabilize at exactly 32°F. According to ChefsTemp, "Just a cup with ice water in it can be 12 or more degrees too high". A properly prepared ice bath should give a reading within ±0.1°F of 32°F.
Submerge the thermometer’s probe so that the 2–3 inch sensing area is fully immersed in the center of the ice slush. Be careful not to let the probe touch the container’s bottom or sides, as this could affect the reading. Stir the probe gently to keep it from contacting ice cubes, and wait for the reading to stabilize - this can take about 30 seconds for a quick digital thermometer or up to 10 minutes for a slower dial model. If the reading isn’t exactly 32°F, adjust your thermometer (if possible) or note the difference as a correction factor for future use.
Tip: Use distilled water instead of tap water. Minerals and impurities in tap water can slightly alter the freezing point.
Boiling Point Method
Bring at least 4 inches of clean water to a steady boil in a pot. Insert your thermometer’s probe vertically into the water, ensuring it’s fully submerged but not touching the pot’s bottom or sides, as this could cause an inaccurate reading.
Allow the thermometer to stabilize. At sea level, it should read 212°F. However, the boiling point decreases by about 2°F for every 1,000 feet of elevation. Refer to the table below for boiling points at different altitudes:
| Elevation | Boiling Point (°F) |
|---|---|
| Sea Level | 212.0°F |
| 2,000 ft | 208.1°F |
| 5,000 ft | 202.4°F |
| 8,000 ft | 197.5°F |
Before making any adjustments, determine the correct boiling point for your location using an online calculator or local atmospheric data. ThermoWorks explains, "Water boils at 212°F at sea level, but only at sea level. Changes in atmospheric pressure at elevations above or below sea level alter the temperature at which water boils". Check your thermometer’s accuracy specifications - most have a tolerance of around ±2°F. If the reading falls within this range, no adjustment is needed. Otherwise, calibrate your thermometer or note a correction factor for future readings.
Safety Tip: Be cautious when working with boiling water and steam. Some digital thermometers with plastic components can warp if exposed to high heat for too long.
With these methods covered, you’re ready to learn how to adjust different types of thermometer sensors.
How to Adjust Different Sensor Types
After calibration, you might need to fine-tune your thermometer to ensure accurate readings. The process varies between dial and digital thermometers, so using the correct method is key to avoiding over-correction and maintaining precision. Let’s break down how to adjust both types.
Dial Thermometers
Dial thermometers rely on a bimetallic strip - a coiled piece of metal that reacts to temperature changes by moving the pointer on the dial. To adjust one, locate the hex nut at the base or back of the dial. Many pocket dial thermometers come with a built-in wrench in their protective sleeve, but small pliers or an adjustable wrench will also work.
Hold the dial steady while the thermometer probe remains in your reference medium, like an ice bath or boiling water. Gently turn the hex nut. As Mark Jenner, Founder of FoodFireFriends, explains, "It's usually a tiny movement". Adjust in small increments, about a quarter turn at a time, and wait for the reading to stabilize before making further changes. This gradual approach helps prevent over-correction.
Once adjusted, let the thermometer return to room temperature before re-testing it to avoid shocking the internal components.
Digital Thermometers
Digital thermometers often include a "CAL", "Reset", or "Calibration" button to simplify adjustments. With the probe immersed in your reference medium - an ice bath at 32°F or boiling water adjusted for your altitude - wait 10 to 30 seconds for the reading to stabilize. Then, press and hold the calibration button until the display confirms the adjustment.
For models without a calibration button, you may need a flat screwdriver to fine-tune a small potentiometer. Always consult your user manual for specific instructions. If the thermometer lacks any built-in calibration function, calculate the offset - the difference between the displayed temperature and the actual reference temperature - and apply this correction to future readings. A practical tip: jot down the offset on a piece of duct tape and attach it to the thermometer for easy reference.
For home cooks using tools like Honeydew Recipe Manager (https://honeydewcook.com) to organize meals and track nutrition, keeping your thermometer properly adjusted is essential. Accurate readings ensure the cooking temperatures in your recipes are correct - a critical factor for food safety, especially when handling proteins or working with precise techniques like sous vide or candy making. Proper adjustments mean safer and more reliable results every time.
When and How Often to Calibrate
Always calibrate a new thermometer before using it for the first time. Maryn Liles, Editor and Content Strategist at Allrecipes, emphasizes this point: "The first thing you should do when you buy a new food thermometer [is] make sure your temp reader isn't a dud". Shipping and handling can sometimes affect the thermometer's accuracy, and since many brands don’t provide factory calibration certificates, a quick home test is crucial.
For ongoing accuracy, test your thermometer every six months under normal use. If you cook frequently, aim to check it monthly. Occasional users should calibrate every two to three months or before tackling big cooking projects . Recalibrate right away if your thermometer is dropped, exposed to extreme temperatures, or subjected to thermal shock. For example, moving it directly from boiling water to an ice bath or leaving it in a hot oven or freezing car can throw off its readings. Regular testing ensures accurate readings, which are essential for food safety. You should also verify accuracy before starting temperature-sensitive tasks like candy making, deep frying, or roasting a holiday turkey.
Setting Up a Calibration Schedule
Once you know how often to calibrate, it’s helpful to create a log for tracking performance. Keeping a record helps you monitor your thermometer’s accuracy over time. Tim from ThermoWorks advises, "It's always a good idea to keep track of your calibrations to monitor the performance of the thermometer over a period of time". In your log, note the date, the method you used, and the pre- and post-calibration readings. This can reveal trends - like if your thermometer consistently drifts by a certain amount - so you’ll know whether to adjust it or replace it.
Proper storage is key to maintaining calibration. Keep your thermometer in its protective case when not in use. If it’s off by more than 2°F and can’t be adjusted, label it with the offset using duct tape or contact the manufacturer for a replacement. For home cooks using tools like Honeydew Recipe Manager (https://honeydewcook.com) to plan meals and track nutrition, an accurate thermometer ensures that cooking temperatures in your recipes are reliable. By logging calibrations regularly, you not only track performance but also uphold food safety and consistency in your cooking results.
Common Calibration Errors to Avoid
Immersion Depth and Stabilization Errors
One of the most frequent mistakes home cooks make is not immersing the thermometer probe deeply enough. To get an accurate reading, the probe needs to be submerged at least 2 inches into the center of the liquid. If the probe is too close to the surface, it might pick up the container's temperature instead of the liquid's, which can skew your calibration by several degrees.
Another common issue is calibrating before the thermometer has stabilized. Digital thermometers usually need 15–30 seconds to settle, while analog dial thermometers can take up to 2 full minutes. Adjusting too soon means you could be setting your thermometer to the wrong temperature. Kyle Halvorson, Consumer Marketing Manager at ThermoWorks, advises:
"The biggest factor is to make sure the ice is not floating... you don't want your probe to rest on ice and you don't want it to be in a pocket of water".
An improperly prepared ice bath can read as much as 12°F too warm, while a properly made ice slurry should stabilize at 32.0°F within ±0.1°F. To ensure accuracy, gently stir the probe for 10–15 seconds until the reading steadies.
Altitude Adjustments and Proper Handling
Environmental factors, like altitude, play a significant role in calibration accuracy. Many assume water boils at 212°F everywhere, but this isn’t true - elevation lowers the boiling point by about 1°F for every 500 feet. If you’re calibrating using the boiling point method without adjusting for altitude, you might unknowingly miscalibrate your thermometer. Online boiling point calculators can help you find the correct temperature for your location and current barometric pressure.
How you handle your thermometer also matters. Dropping it or quickly moving it between extreme temperatures - like from hot oil to an ice bath - can damage its internal components, leading to calibration drift. Before making any adjustments, check your thermometer’s specifications. If it’s within its stated tolerance (often ±0.7°F to ±2°F), there’s no need to recalibrate. ThermoWorks emphasizes:
"If your thermometer is within specification, you should not adjust its calibration settings".
Attempting to recalibrate an already accurate thermometer can actually reduce its precision. Proper care and handling ensure your thermometer stays dependable for safe cooking.
Forgetting to Re-Verify
After making adjustments, it’s critical to re-verify your thermometer. Once you’ve adjusted the calibration nut or pressed the reset button, test it again in the same ice or boiling water bath. This step confirms that the adjustment worked and that the thermometer is now reading accurately. Skipping this step could leave you with an inaccurate tool.
This is especially important if you’re using tools like the Honeydew Recipe Manager (https://honeydewcook.com), where precise cooking temperatures help ensure your recipes turn out perfectly and your nutrition tracking stays on point. Re-verifying your thermometer not only ensures accuracy but also supports food safety in your kitchen.
Conclusion
Precise temperature readings are a game-changer in the kitchen. Even a small error of 2°F–3°F can take your roast from medium-rare to well-done - or worse, leave harmful bacteria behind. As food writer Andrea Rivera Wawrzyn aptly states:
"A thermometer is only as good as its accuracy"
Thankfully, calibration is quick and easy. Use an ice bath at 32°F or adjust for your altitude when boiling water. The whole process takes just a few minutes. For regular use, calibrate your thermometer every six months, or monthly if you cook daily. Always recheck after dropping your thermometer or exposing it to extreme temperatures.
To avoid common mistakes, make sure the probe is fully submerged, give it time to stabilize, and account for altitude adjustments. After making any adjustments, double-check the accuracy to ensure your thermometer is performing as it should.
Consistent calibration is the key to reliable results. Pairing a calibrated thermometer with tools like Honeydew Recipe Manager (https://honeydewcook.com) can help keep your recipes and nutrition analysis precise. Keeping a simple log of calibration dates is another smart move to track performance and catch any issues early.
With these easy techniques, you’ll ensure both safety and precision in your cooking - every single time.
FAQs
Should I replace a thermometer that won’t calibrate?
If your thermometer remains uncalibrated after several attempts, it's time to replace it. Accurate temperature readings are crucial for cooking safely and achieving consistent results. A malfunctioning thermometer can throw off your entire process, leading to uneven or unsafe outcomes.
Can I calibrate an instant-read thermometer and an oven probe the same way?
To check an instant-read thermometer's accuracy, use boiling water or ice water as a reference point. If it’s off, adjust it accordingly. For an oven probe, compare the oven’s temperature to a reliable thermometer. If there’s a difference, tweak the oven’s settings or calibration controls. The key difference? One ensures the thermometer itself is accurate, while the other confirms the oven’s temperature.
How do I handle a thermometer that’s accurate at 32°F but wrong at high heat?
To ensure your thermometer provides accurate readings, test it at two key temperature points: freezing water (32°F) and boiling water (212°F). If it reads correctly at freezing but is off at higher temperatures, you'll need to adjust or recalibrate it. This process helps confirm its accuracy across the entire temperature range.