Sous Vide for Meal Prep
• Updated
Sous vide cooking is a simple way to prepare meals with precision and consistency. By sealing food in bags and cooking it in a water bath at a controlled temperature, you can lock in moisture, flavor, and nutrients. It’s perfect for batch cooking, as you can prepare multiple portions at once and store them for days. Reheating is easy - just use the same water bath method to maintain texture and taste.
Key Takeaways:
- Sous vide ensures even cooking and prevents overcooking.
- Foods like chicken, steak, and vegetables stay fresh for up to a week when vacuum-sealed and chilled properly.
- A few tools are essential: an immersion circulator, vacuum sealer (or freezer bags), and an ice bath.
- Reheating sous vide meals avoids dry or unevenly heated food.
For meal prep, sous vide saves time and effort while delivering consistently flavorful results.
Equipment You Need for Sous Vide Meal Prep
Basic Tools
Getting started with sous vide meal prep doesn’t require much equipment. At the heart of it all is the immersion circulator (or precision cooker). This handy device clips to a container and keeps the water at a steady, precise temperature. Pair it with a large pot or a dedicated plastic container for your water bath - just make sure it’s deep enough for the circulator to do its job effectively.
A vacuum sealer is another key tool. It locks in juices and flavors, making it essential for consistent results. Chelsea Cole highlights its benefits:
A vacuum sealer lets you batch prep and freeze food without freezer burn.
If you don’t have a vacuum sealer, heavy-duty zip-top freezer bags work as a great alternative. Just use the water displacement method to remove excess air.
An ice bath is also an important step in the process. Simply fill a bowl with equal parts ice and water. After cooking, submerge your sealed bags in the ice bath for 20–30 minutes. This quick chill not only ensures food safety but also keeps your meals fresh for longer.
When it comes to immersion circulators, affordable models perform well. Chelsea Cole recommends:
the Breville Joule is my favorite, but the Anova Nano is a great, affordable starter option. Any circulator from a reputable brand with good reviews will do the trick.
WiFi-enabled models, like the Anova Nano, even allow for remote control, adding a layer of convenience to your cooking routine.
Optional Accessories
While the basics are enough to get started, a few extra tools can make your sous vide meal prep even smoother. For instance, bag weights or heavy ceramic plates come in handy for keeping your bags fully submerged. Breville advises:
If you find your bags tend to float, try weighing them down with plates to keep the bags fully submerged during cooking.
If you’re cooking multiple bags at once, a sous vide rack helps keep everything organized and ensures water circulates evenly around each bag. For longer cooking sessions - like when preparing pork shoulder or brisket - an insulated lid can prevent water from evaporating, saving you the hassle of constant refills.
Finally, while sous vide ensures perfectly cooked interiors, finishing your proteins in a cast iron skillet or with a kitchen torch gives them that golden, crispy exterior that’s hard to resist. These optional tools can take your sous vide game to the next level.
Sous Vide Chicken Breast Meal Prep: 5 Flavors and 5 Unique Chicken Meals
How to Meal Prep with Sous Vide

Sous Vide Temperature and Time Guide for Meal Prep
Preparation and Vacuum Sealing
When meal prepping with sous vide, start by portioning proteins from bulk purchases into individual servings. This works well for both single meals and family dinners. Season each portion generously with salt, spices, or flavorful pastes like harissa or curry. For an added depth of flavor, press aromatics like rosemary, thyme, or bay leaves against the meat before sealing.
Place the seasoned ingredients in a single layer inside a food-grade vacuum bag or a sturdy freezer bag, leaving a few inches of space at the top for sealing. If you're using a vacuum sealer, position the open end of the bag in the sealer chamber. Select the "Dry" setting for most foods or "Moist" for items with higher juice content. Close the lid and start the vacuum process. If you notice liquid creeping toward the sealer, manually press the "Seal" button to avoid any mess. For extra security during long cooking times, double or triple seal the bag.
No vacuum sealer? No problem. Use the water displacement method with heavy-duty zip-top bags. Simply lower the bag into water, forcing out air before sealing the top. Always label your bags with the contents and date before storing. Lay them flat in the freezer to save space and ensure even cooking or thawing later.
Once your ingredients are sealed and ready, the next step is achieving perfect temperature control.
Cooking and Temperature Control
Sous vide cooking is all about precision. By controlling the temperature, you eliminate guesswork and ensure consistent results every time. Set your circulator to the desired temperature - such as 129°F for medium-rare steak or 140°F–145°F for chicken - and cook foods with similar temperature requirements together. To ensure even heating, lay the food in a single layer within each bag.
| Food Item | Preferred Temperature | Government Pasteurization Time |
|---|---|---|
| Steak (Medium-Rare) | 129°F - 130°F | 112 minutes at 130°F |
| Chicken Breast | 140°F - 145°F | 11 minutes at 140°F |
| Pork Chops | 135°F - 140°F | 11 minutes at 140°F |
| Fish (Tender/Flaky) | 124°F | Varies by thickness |
If the bags start to float, secure them with binder clips or weigh them down to keep them submerged. Watch out for "ballooning" bags, which could mean a seal failure or bacterial gas production - if this happens, discard the food immediately. Keep in mind that cooking time increases significantly with thicker portions, so adjust your timing based on the thickness of your food.
Once your food is perfectly cooked, you'll want to cool it quickly to preserve its quality.
Storage and Reheating
After cooking, immediately submerge the sealed bags in an ice bath to cool them rapidly. This process, known as the "cook-chill" method, stops any carryover cooking and prevents bacterial growth. Aim to lower the temperature from 130°F to 41°F within six hours.
Properly cooled, vacuum-sealed meals can last 5–7 days in the refrigerator or up to 12 months in the freezer. When it's time to eat, reheat your food in a sous vide bath set 5°F–10°F below the original cooking temperature. If you'd like, finish proteins with a quick sear for added texture. Reheating from frozen? Add an extra 30–60 minutes to the usual time. Avoid using the microwave for proteins, as it heats unevenly and can ruin the tender texture that sous vide cooking creates.
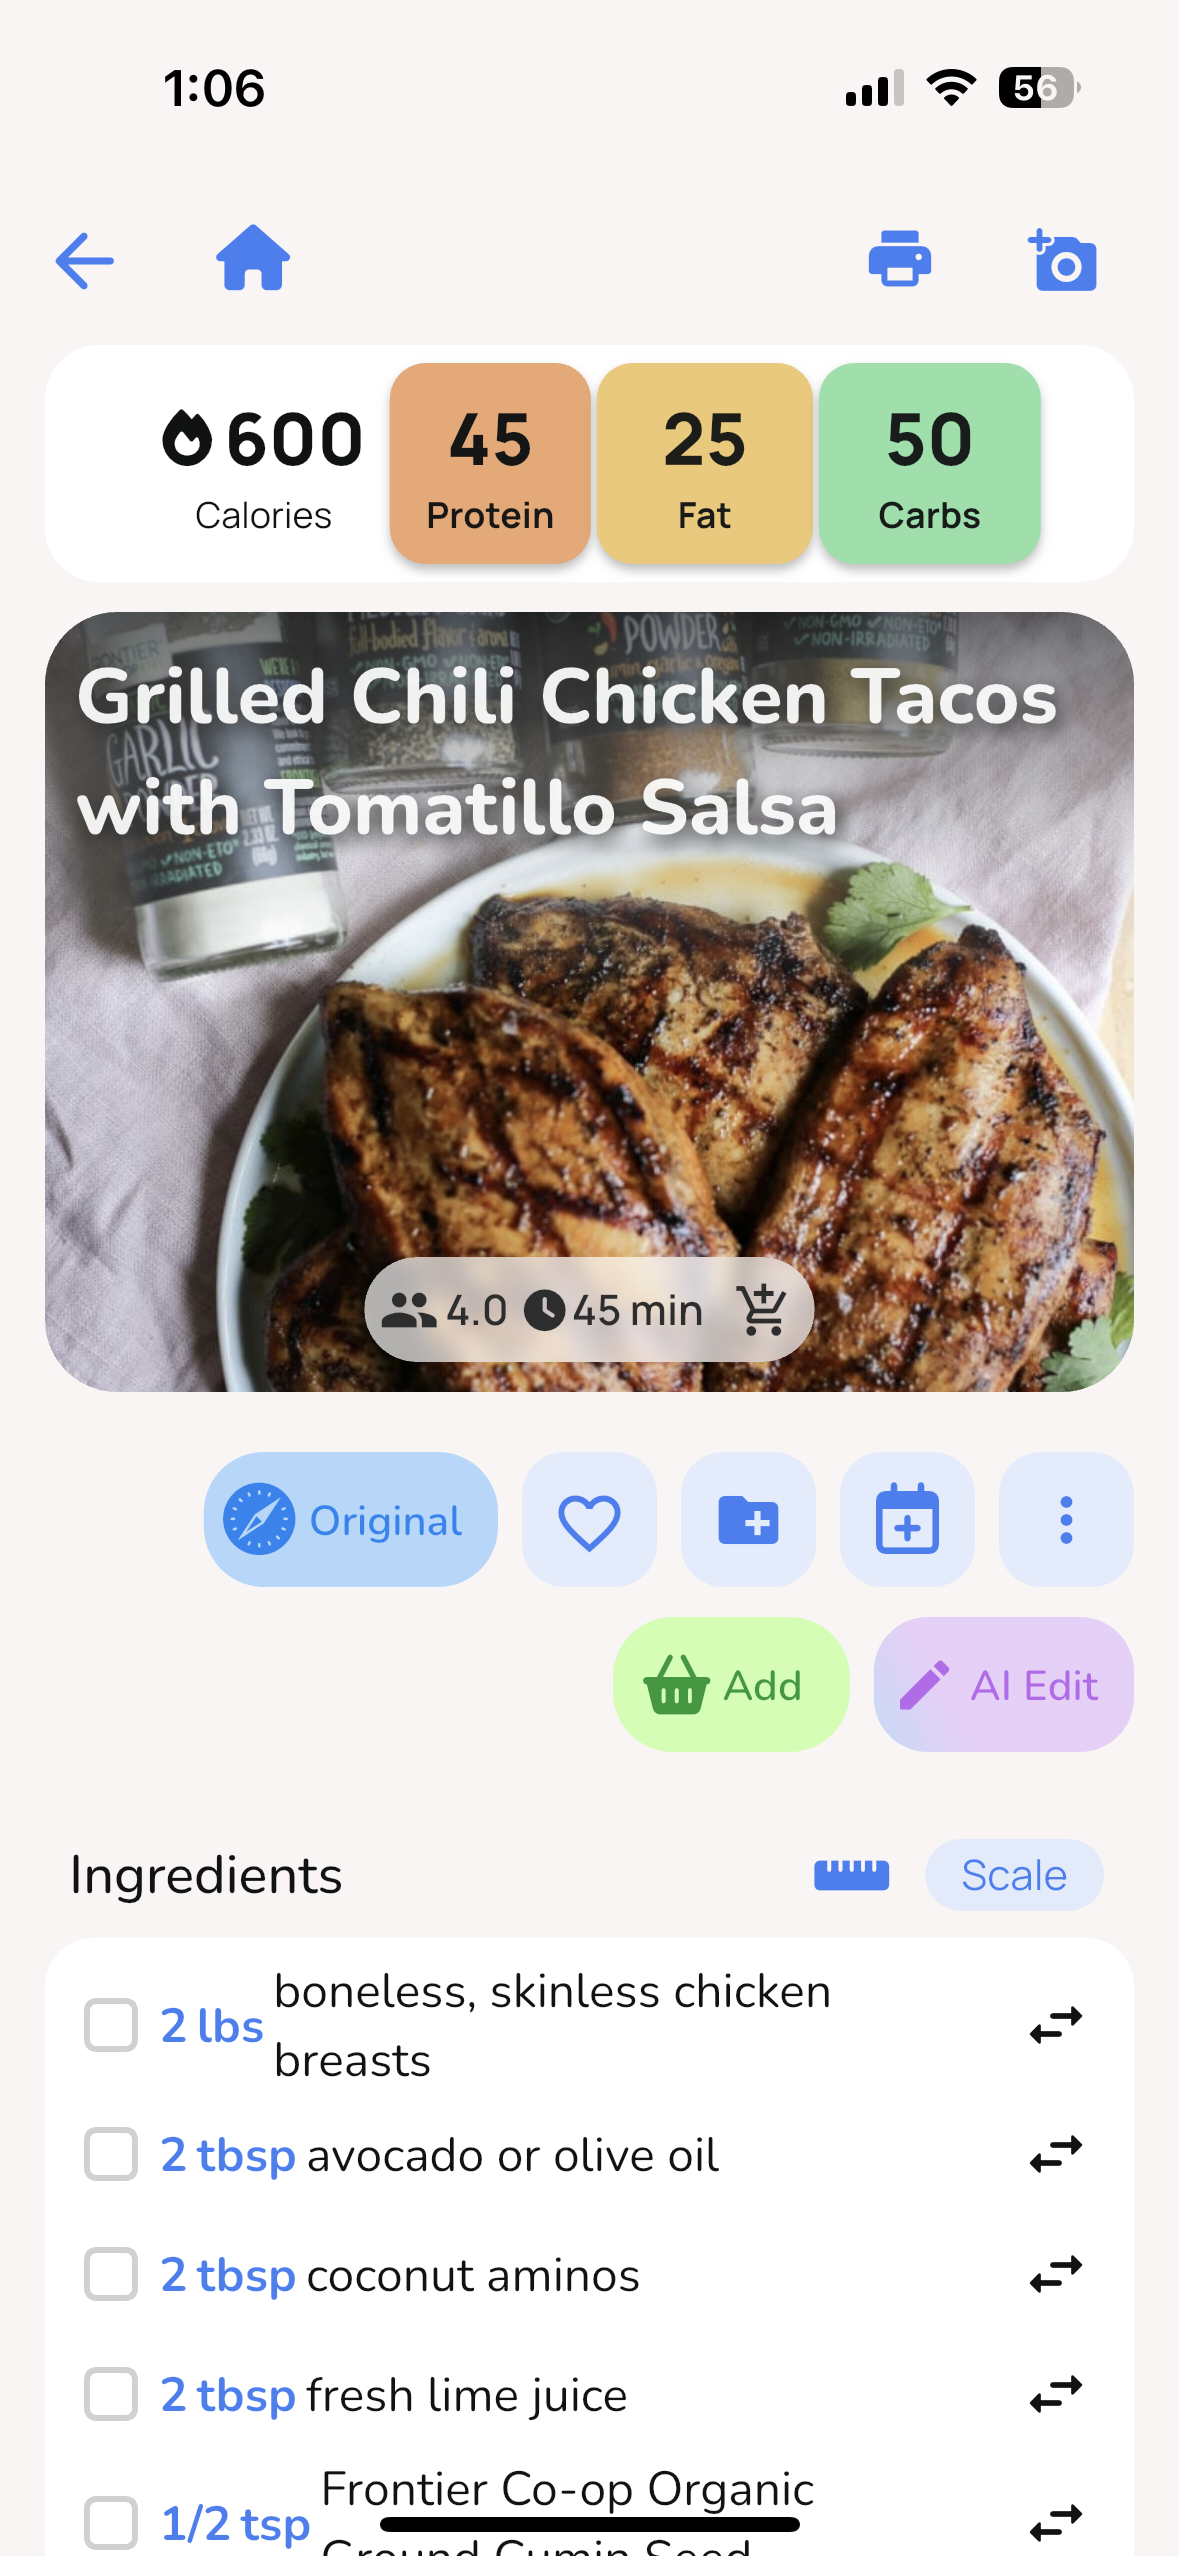
Using Honeydew Recipe Manager for Sous Vide Meal Prep
Take your sous vide cooking to the next level with Honeydew Recipe Manager, a digital tool designed to make meal prep easier and more organized.
Importing Sous Vide Recipes
Tracking down sous vide recipes from social media or websites can be a hassle. Honeydew Recipe Manager eliminates this problem by allowing you to import recipes directly from any platform or site. Just paste the link, and the app does the rest - extracting all the essential details like ingredients, cooking temperatures (e.g., 140°F for chicken breast), and vacuum sealing instructions. No manual entry required.
The app ensures that every detail crucial to sous vide cooking is preserved. Need to scale a recipe for batch cooking? Just tap a button. With users saving around 270,000 recipes each month, Honeydew has become a trusted companion for sous vide enthusiasts. As Priya K. puts it:
Being able to import recipes from anywhere has built my cookbook faster than I ever imagined.
You can also organize your favorite recipes into folders, making it simple to find exactly what you need when planning meals. This level of organization lays the groundwork for stress-free meal prep.
AI-Powered Meal Planning
Figuring out what to cook and when to prepare it can be overwhelming. Honeydew’s AI simplifies this process by analyzing your saved recipes and creating a complete weekly meal plan in seconds. It even generates a batch-cooking schedule, taking advantage of sous vide’s hands-off cooking style.
The AI doesn’t just stop at scheduling. It optimizes your plan by recommending ingredient swaps and adjusting portion sizes to suit your household. On average, users of AI meal planning tools save $125 per month on groceries, thanks to less waste and smarter shopping. Whether you’re cooking for yourself or a family of six, Honeydew crafts a practical schedule that matches your lifestyle.
Simplified Grocery Shopping
Once your meal plan is ready, Honeydew automatically generates a grocery list tailored for batch cooking. This feature highlights sous vide’s efficiency - proteins, for example, lose less than 1% of their weight during cooking, compared to up to 20% with traditional methods.
With Instacart integration, you can order ingredients with a single tap. For example, prepping a week’s worth of sous vide meals might cost around $50. As James L. shares:
The smart grocery lists save me hundreds of dollars a month. I love how it suggests recipes based on what I already have!
The app uses imperial measurements and displays prices in US dollars, making it ideal for American home cooks. With a 4.8/5-star rating, Honeydew ensures your sous vide meal prep is seamless from start to finish.
Conclusion
Sous vide cooking takes meal prep to the next level by offering precise temperature control that ensures consistently perfect results. Say goodbye to guesswork - proteins are cooked to perfection every time, staying moist and flavorful. Plus, this method helps retain important minerals like zinc, iron, and potassium, which are often lost with traditional boiling methods.
Another big perk? Efficiency in bulk cooking. Stock up on proteins during sales, portion them, season, vacuum seal, and freeze without worrying about freezer burn. When you're ready to cook, you can go straight from freezer to sous vide - just add about 50% more cooking time. Or, pre-cook your meals, chill them, and reheat for quick dinners on hectic nights.
Once you've nailed the basics, smart tools can make things even easier. For example, Honeydew Recipe Manager simplifies everything. You can import sous vide recipes with a tap, let AI plan your weekly meals in seconds, and instantly generate grocery lists. With Instacart integration, you can even order your groceries directly through the app.
To keep your sous vide meals at their best, make sure to cool them quickly, label them properly, and reheat with care.
FAQs
How can I prevent my sous vide bags from floating during cooking?
To keep your sous vide bags fully submerged and ensure even cooking, here are a few practical tips:
- Get rid of excess air: Use a vacuum sealer or try the water displacement method to remove as much air as possible from the bag before sealing.
- Add a little weight: Place a small, food-safe item like a stainless steel spoon or a butter knife inside the bag before sealing. This helps keep it from floating.
- Use a rack or sinker: Position the bag on a silicone or stainless steel rack at the bottom of your water bath, or try a sous vide sinker to hold it securely in place.
For longer cooking sessions, it’s a good idea to check occasionally and release any air bubbles that might form. If you’re planning to batch-cook, the Honeydew Recipe Manager can be a handy tool to organize your sous vide recipes, create shopping lists, and make meal prep simpler!
What are the advantages of using a vacuum sealer for sous vide meal prep?
Using a vacuum sealer for sous vide meal prep comes with some serious perks. By sealing your food in an airtight, waterproof bag, you eliminate the risk of water diluting the flavors while ensuring precise temperature control for even cooking. This technique locks in the natural juices and enhances the impact of seasonings and aromatics, delivering moist, flavorful dishes that are tough to replicate with traditional cooking methods.
Another big advantage? Vacuum-sealed bags help extend the shelf life of your meals. They shield food from oxygen and freezer burn, so you can refrigerate your meals for up to a week or freeze them for several months without losing quality. Plus, sous vide cooking keeps more nutrients intact compared to high-heat methods since vitamins and minerals don’t escape into cooking liquids.
Want to make meal prep even easier? Pair your vacuum sealer with a tool like Honeydew Recipe Manager. This handy app lets you import recipes, build grocery lists, and organize your meals with ease. Together, they streamline the entire process, turning sous vide meal prep into a time-saving solution perfect for busy households.
How do I safely cool sous vide meals for storage?
To keep your sous vide meals safe and fresh, cooling them quickly is key. This helps prevent bacteria from growing and keeps the food at its best. Here’s how to do it right:
- Set up an ice bath: Grab a large container and fill it halfway with cold water and plenty of ice. The goal is to keep the water at or below 41°F.
- Submerge the sealed bags: Place your vacuum-sealed bags into the ice bath, making sure they’re fully submerged with no air pockets.
- Chill thoroughly: Depending on the thickness of the food, leave the bags in the ice bath for 30 minutes to 2 hours. Keep an eye on the ice and add more if needed to maintain the cold temperature.
- Dry and store: Once chilled, pat the bags dry, label them with the contents and date, and store them in the fridge for up to 48 hours. For longer storage, pop them in the freezer.
Quick Tip: Make sure the food’s core temperature drops to 40°F or lower within 2 hours. This keeps it out of the "danger zone", where bacteria can thrive. Proper cooling ensures your meals stay safe and ready to enjoy!