Ultimate Guide to Freezing and Thawing
• Updated
Freezing food saves time, reduces waste, and simplifies meal prep. But to preserve taste and texture, you need the right techniques for freezing and thawing. Here's what you should know:
- Freezing Basics: Store food at 0°F or below to keep it safe indefinitely, though quality may decline over time.
- What Freezes Well: Meats, vegetables (blanched first), soups, casseroles, and baked goods are freezer-friendly. High-water foods like lettuce or raw potatoes don’t freeze well.
- Packaging Tips: Use heavy-duty freezer bags, airtight containers, or vacuum sealers. Remove air to prevent freezer burn and label everything with the name and date.
- Safe Thawing Methods: Thaw in the fridge, in cold water (changing water every 30 minutes), or in the microwave - never at room temperature.
- Batch Cooking: Prepare meals in bulk, freeze portions, and reheat as needed. Casseroles, soups, and marinated proteins are great options.
Freezing properly ensures your meals retain flavor, texture, and safety. A little prep goes a long way in making your freezer an efficient tool for meal planning.
The Best Way to Freeze and Defrost Food
Preparing Food for Freezing
Getting your food ready for the freezer isn’t just about tossing it in and hoping for the best. Proper preparation helps maintain flavor and texture while avoiding freezer burn or mushiness. These tips can make the difference between meals that taste fresh months later and ones that fall flat. By nailing these techniques, you’ll not only save time but also cut down on food waste.
Which Foods Freeze Well (and Which Don't)
Not every food is built for the freezer. Proteins like meats, poultry, and fish freeze well, as do most vegetables, soups, stews, casseroles, bread, and baked goods - provided they’re packaged correctly. Fruits like berries, stone fruits (once pitted), and sliced apples also hold up nicely. However, citrus fruits don’t last as long, staying fresh for about 3 months, compared to the 8 to 12 months you can get from other fruits.
On the other hand, certain foods don’t freeze as well. High-water-content produce like lettuce, celery, cucumbers, and radishes tend to become soggy after thawing. Cream-based sauces, mayonnaise, and gelatin-based dishes can separate or turn grainy. Raw potatoes are another tricky one - they don’t freeze well due to their water content, though you can parboil or fry waxy potatoes for about 5 minutes before freezing.
Pre-Freezing Preparation Steps
For most vegetables, blanching is key. This quick boil or steam process halts enzyme activity that can ruin flavor, color, and texture. For example, blanch broccoli and cauliflower for 3 minutes, green beans for 3 minutes, and corn on the cob for 4 minutes. After blanching, immediately plunge them into an ice bath to stop the cooking process. Some exceptions, like peppers and onions, can be frozen raw without blanching.
Cooling hot foods quickly is also important. Use an ice water bath to bring the temperature down rapidly. Food safety guidelines recommend cooling from 120°F to 70°F within two hours, and then to 45°F within four hours total. This step prevents bacteria growth while keeping your freezer temperature stable.
For pasta dishes, slightly undercook the pasta before freezing to avoid mushiness when reheating. Cooked grains like rice or quinoa can be spread out on a baking sheet to cool and frozen individually before transferring to a bag - this keeps them from clumping. Liquids like broth, wine, or tomato paste can be portioned into ice cube trays, frozen, and then stored in freezer bags for easy use. You can even freeze minced garlic in oil for a quick flavor boost later.
Once your food is prepped and cooled, you’re ready to package it properly for the freezer.
Freezing Supplies You'll Need
Packaging is everything when it comes to freezing food. The right supplies help prevent moisture loss and oxidation. Stock up on heavy-duty aluminum foil, freezer-grade zipper-lock bags (which are thicker than regular ones), airtight plastic or glass containers, freezer tape, and a vacuum sealer. If you don’t have a vacuum sealer, you can use the water displacement method: place your food in a bag, seal it almost all the way, and submerge it in water to push the air out before sealing completely.
For glass containers, choose straight-sided, wide-mouth Mason jars labeled for freezing. Avoid jars with curved shoulders, as these can crack when food expands as it freezes. Always leave some headspace - about 1/2 to 1 inch at the top of containers - to allow liquids to expand. For solid items like meat or bread, wrap them tightly in plastic wrap or foil first, then place them in a freezer bag for extra protection. Don’t forget to label everything with the item name, freezing date, and reheating instructions using freezer-proof labels and permanent markers.
How to Freeze Food Properly
After prepping your food, the next step is freezing it the right way to lock in flavor and freshness. The way you package and store items can be the difference between a delicious meal months down the line or a disappointing case of freezer burn. Let’s break it down.
Packaging Methods to Prevent Freezer Burn
Freezer burn happens when air sneaks into your packaging, causing dehydration and oxidation. Keith Dresser from America's Test Kitchen sums it up perfectly:
When freezing food, air is the enemy. Freezer burn... happens when frozen food is exposed to air and dehydrates and oxidizes.
While freezer burn doesn’t make food unsafe to eat, it does lead to dry, leathery spots that can ruin both texture and flavor.
To avoid this:
- Double-wrap solid foods. Start with plastic wrap, then place the item in a freezer-safe bag, squeezing out as much air as possible.
- For liquids, use gallon-sized freezer bags and freeze them flat. This saves space and makes stacking easier.
- Rigid containers? Place plastic wrap directly on the food’s surface before sealing the lid to create an extra layer of protection.
Avoid using containers like yogurt or margarine tubs for freezing. They’re not moisture-resistant enough for long-term storage. And if you’re freezing meat in its original packaging, overwrap it with freezer paper or foil to prevent air exposure, as many retail wraps are air-permeable.
For the fastest freeze, spread items out in a single layer across different shelves so cold air can circulate freely. A general rule: food about 2 inches thick should freeze solid within 2 hours. To avoid overloading your freezer, limit additions to 2–3 pounds of unfrozen food per cubic foot of freezer space in a 24-hour period.
Once you’ve mastered packaging, the next step is keeping your freezer organized and labeling everything clearly.
Labeling and Organizing Your Freezer
Even perfectly frozen food can go to waste if you forget it’s there. That’s why labeling is key. Include the item name, freezing date, number of servings, and any special prep notes (like “add cream when reheating” or “undercooked pasta”). Use freezer tape or a moisture-resistant marker to ensure the labels stick.
Keith Dresser offers a smart tip for keeping track:
Storing leftovers in the freezer is great - until you forget about them. To keep track of what you have, affix a dry-erase board to the freezer and make notes when you add (or remove) items.
Group similar items together - like meats, veggies, or soups - and follow the FIFO (First In, First Out) method. This makes it easier to find what you need and reduces waste. Plus, a well-stocked freezer is more energy-efficient because the frozen items help maintain a steady temperature.
Here’s another benefit: During a power outage, a full freezer can keep food frozen for about 48 hours if the door stays closed. A half-full freezer? Only about 24 hours.
Once everything is labeled and organized, make sure your freezer is set to the right temperature.
Freezer Temperature and Storage Times
For the best results, keep your freezer at 0°F (-18°C) or lower. Use a standalone thermometer to double-check the temperature. At 0°F, freezing halts the activity of microbes like bacteria and molds, keeping food safe from spoilage. As the USDA explains:
Food stored constantly at 0°F will always be safe. Only the quality suffers with lengthy freezer storage.
While food remains safe indefinitely at this temperature, its quality does decline over time. Here’s a quick guide to storage times for the best quality:
| Food Item | Storage Time at 0°F for Best Quality |
|---|---|
| Whole chicken or turkey | 12 months |
| Poultry parts | 9 months |
| Fresh beef steaks and roasts | 4 to 12 months |
| Fresh pork roasts and chops | 4 to 8 months |
| Ground meats | 3 to 4 months |
| Bacon and sausage | 1 to 2 months |
| Lean fish (e.g., cod, flounder) | 6 to 8 months |
| Fatty fish (e.g., salmon, tuna) | 2 to 3 months |
| Cooked meat or poultry leftovers | 2 to 6 months |
| Soups and stews | 2 to 3 months |
| Fruits and vegetables | 8 to 12 months |
As Dresser points out:
The quicker foods freeze, and the fewer fluctuations in temperature once frozen, the better.
To keep quality high, minimize how often you open the freezer and avoid leaving the door open while deciding what to grab. Every little step helps maintain that frozen goodness!
Safe Thawing Methods
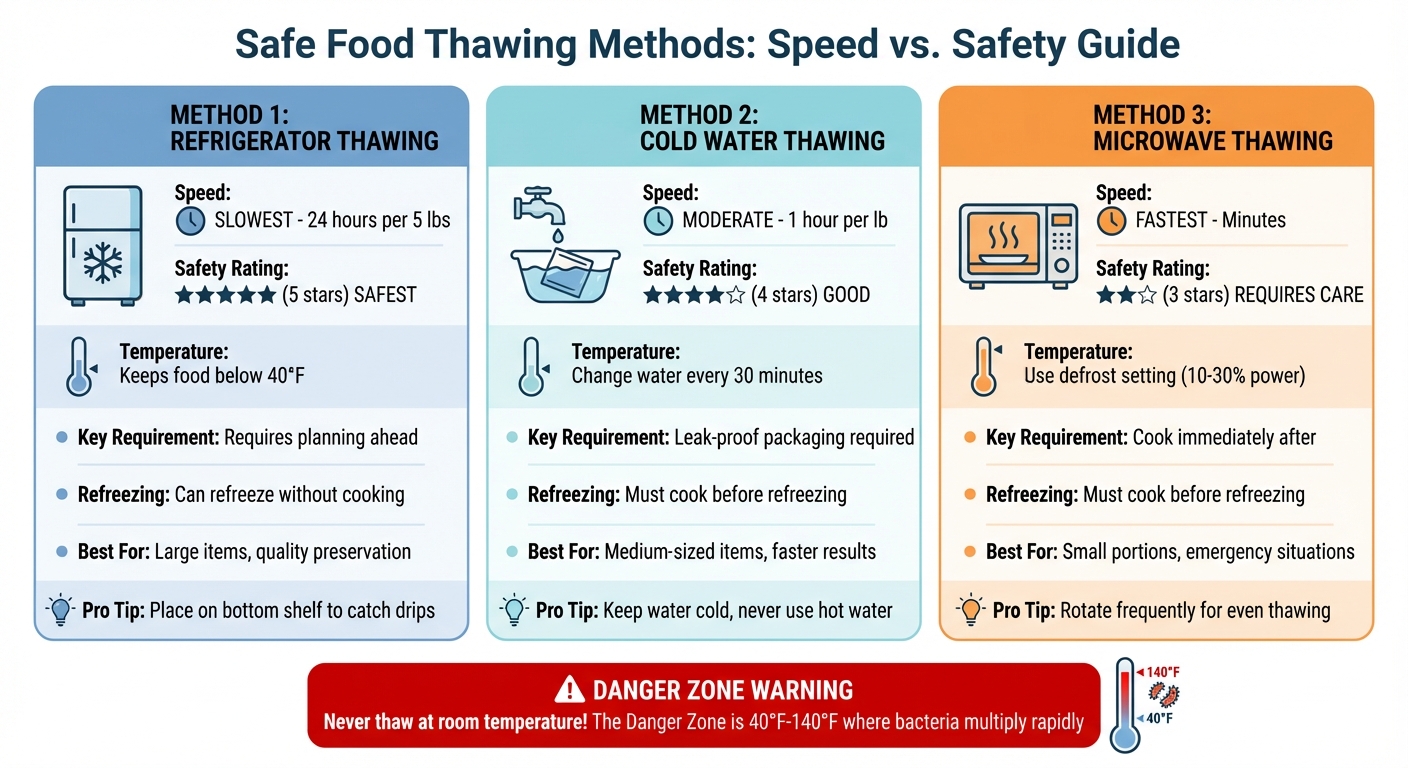
Safe Food Thawing Methods Comparison Chart
Proper freezing is only half the battle when it comes to preserving your food. At some point, you'll need to thaw it, and how you do it can make a big difference in both safety and quality. According to Laurie Messing, Extension Educator at Michigan State University:
In the process of thawing, never keep food in the "Danger Zone", between 40°F and 140°F. Bacteria can grow quickly in these temperatures.
Letting food sit out at room temperature might seem convenient, but it’s risky. The outer layers of the food can warm to unsafe levels while the inside remains frozen, creating the perfect conditions for bacteria to thrive. To avoid this, stick to one of the three safe thawing methods: in the refrigerator, in cold water, or using the microwave. Each has its own pros and cons, so let’s break them down:
| Method | Speed | Safety/Quality | Key Requirement |
|---|---|---|---|
| Refrigerator | Slowest (about 24 hours per 5 lbs) | Safest; maintains quality and keeps food below 40°F | Requires planning ahead |
| Cold Water | Moderate (about 1 hour per lb) | Good; needs close attention | Use leak-proof packaging and change water often |
| Microwave | Fastest (minutes) | Can be uneven; requires care | Cook immediately after thawing |
One important point: If you thaw food in the refrigerator, you can refreeze it without cooking (though the quality might drop). However, food thawed with cold water or in the microwave must be cooked before refreezing. Let’s explore each method in more detail.
Refrigerator Thawing
This method is slow, but it’s the safest and best for preserving food quality. As Bon Appétit explains:
The most controlled and accurate way to thaw something is to move the dish or ingredient from your freezer to your refrigerator, and wait.
The refrigerator keeps food safely below 40°F throughout the process. While it takes time - about 24 hours for every 5 pounds of food - it’s worth the wait. For example, a 1-pound package of ground meat or frozen fruit might take a full day, while larger items like turkeys could need several days.
To thaw properly, place your food on a tray or in a pan on the bottom shelf to catch any drips and avoid cross-contamination. Keep your fridge set between 35°F and 40°F for optimal results. The best part? Food thawed this way can stay in the fridge for a day or two before cooking, or you can refreeze it without cooking.
Cold Water Thawing
If you’re short on time, cold water thawing is a faster alternative. Water transfers heat much more efficiently than air, which speeds up the process. For instance, a 1-pound package of meat can thaw in about an hour, while a 3- to 4-pound package might take 2 to 3 hours. Whole turkeys generally require 30 minutes per pound.
To ensure safety, seal the food in an airtight, leak-proof bag to prevent water from seeping in and potentially contaminating it. Submerge the bag in cold tap water, and make sure to change the water every 30 minutes to maintain a consistently cold temperature. As Shauna Henley, Family and Consumer Sciences Educator at the University of Maryland Extension, advises:
You want to defrost food the safe way... It's to prevent potential foodborne illness or food poisoning.
Microwave Thawing
For the ultimate time-saver, the microwave is your go-to option. It can defrost food in minutes, but it requires extra care. Microwaves heat unevenly, which means parts of the food might start cooking while other sections remain frozen. This uneven heating can bring some areas into unsafe temperatures, increasing the risk of bacteria growth.
To minimize these risks, use the microwave’s defrost setting or set it to low power (10% to 30%). Work in short intervals of about 3 minutes, rotating the food frequently to ensure even thawing. Always remove food from its original packaging - especially foam trays or plastic wraps not designed for heat - and place it on a microwave-safe dish. If you’re thawing leftovers, make sure they’re heated to an internal temperature of 165°F before serving.
A quick word of warning: Never use hot water to speed up any thawing process. It can heat the surface of your food to unsafe levels, giving bacteria a chance to multiply.
Important Reminder: Food thawed in cold water or the microwave must be cooked immediately.
Cooking Food Directly from Frozen
Once you've mastered freezing techniques, the next step is learning how to cook food directly from frozen. This approach can save time and simplify meal prep. According to the National Center for Home Food Preservation, many meats and fish can be cooked straight from frozen - just plan for a longer cooking time.
As a general rule, increase cooking time by about 50%. For example, if a fresh chicken breast takes 20 minutes to cook, a frozen one will need closer to 30 minutes. Similarly, a 9x13-inch casserole may require 2.5–3 hours instead of the usual time. Stick to the recipe's oven temperature but extend the cooking time as needed. To ensure food safety, make sure reheated dishes reach at least 165°F (145°F for fish). Using a meat thermometer is especially important for large roasts or thick casseroles to check that the center is fully cooked.
Frozen vegetables are another great candidate for direct cooking. In fact, cooking them straight from frozen often helps retain their nutrients and texture. Toss them directly into boiling water for best results. That said, certain items like corn on the cob or leafy greens (e.g., spinach) benefit from partial thawing to ensure even heating. The USDA advises that whole poultry intended to be stuffed must be completely thawed before cooking, though some commercially pre-stuffed birds are designed for cooking straight from frozen.
For best results, add toppings like cheese or breadcrumbs during the last 15–20 minutes of cooking to avoid sogginess. When reheating creamy casseroles, consider using a double boiler to prevent sticking or an overly mushy texture. Finally, avoid putting cold glass dishes into a preheated oven unless they are specifically labeled as "freezer-to-oven safe".
Common Freezing and Thawing Mistakes to Avoid
Even small mistakes can ruin your freezing efforts. Using non-freezer-safe materials - like bread wrappers, milk cartons, or regular glass jars - can lead to freezer burn or even breakage. Chef and cookbook author Jenny McCoy emphasizes this point:
Never, ever, ever freeze in glass jars unless you know they're explicitly freezer-safe. Glass that hasn't been tempered risks shattering - particularly if you're freezing a liquid that could expand as it freezes.
To avoid freezer burn, always use proper packaging materials. Heavy-duty freezer bags, aluminum foil, or containers labeled as freezer-safe are your best options.
Another common issue is overloading the freezer. Adding more than 2 to 3 pounds of unfrozen food per cubic foot can slow down the freezing process, leading to larger ice crystals and potential container damage. Additionally, when freezing liquids, leave enough headspace in your containers - about 1/2 inch for pints and 1 inch for quarts in wide-mouth containers. Narrow-mouth containers may need even more space to accommodate expansion.
Thawing improperly is another pitfall. The National Center for Home Food Preservation reminds us that freezing doesn't kill bacteria; it only makes them dormant. Thawing food at room temperature or in warm water allows bacteria to multiply quickly in the "Danger Zone" (40°F to 140°F). Any perishable food left above 40°F for more than 2 hours should be thrown out, not refrozen.
While refreezing refrigerated food is safe, repeated freeze-thaw cycles can damage quality by forming larger ice crystals. If you thaw food using a microwave or cold water, it must be cooked before refreezing to ensure safety.
Skipping blanching is another mistake that can harm texture and flavor, as enzymes remain active and continue to degrade the food. To keep your freezer running efficiently, use an appliance thermometer to ensure it stays at 0°F. Also, label all packages with the product name, freezing date, and serving size to make stock rotation easier.
Batch Cooking and Freezer Meal Ideas
Batch cooking is a game-changer for anyone looking to save time and reduce stress in the kitchen. By preparing meals in large quantities and freezing them, you create a stash of ready-to-eat dishes, perfect for those chaotic weeknights when takeout feels like the only option. As Heath Goldman from Food Network Kitchen explains:
Prepping meals ahead of time and stashing them in the freezer is kind of like giving a gift to your future self.
The secret to successful batch cooking lies in picking meals that freeze and reheat beautifully. Dishes with plenty of sauce - like soups, stews, and braises - are excellent choices since the liquid helps keep everything moist. Casseroles, marinated proteins, and cooked grains are also freezer-friendly. If you're including pasta or vegetables, undercook them slightly so they finish cooking when reheated. After cooking, cool everything quickly to avoid raising the freezer's temperature. For an even smoother process, consider using meal planning tools to organize your cooking sessions.
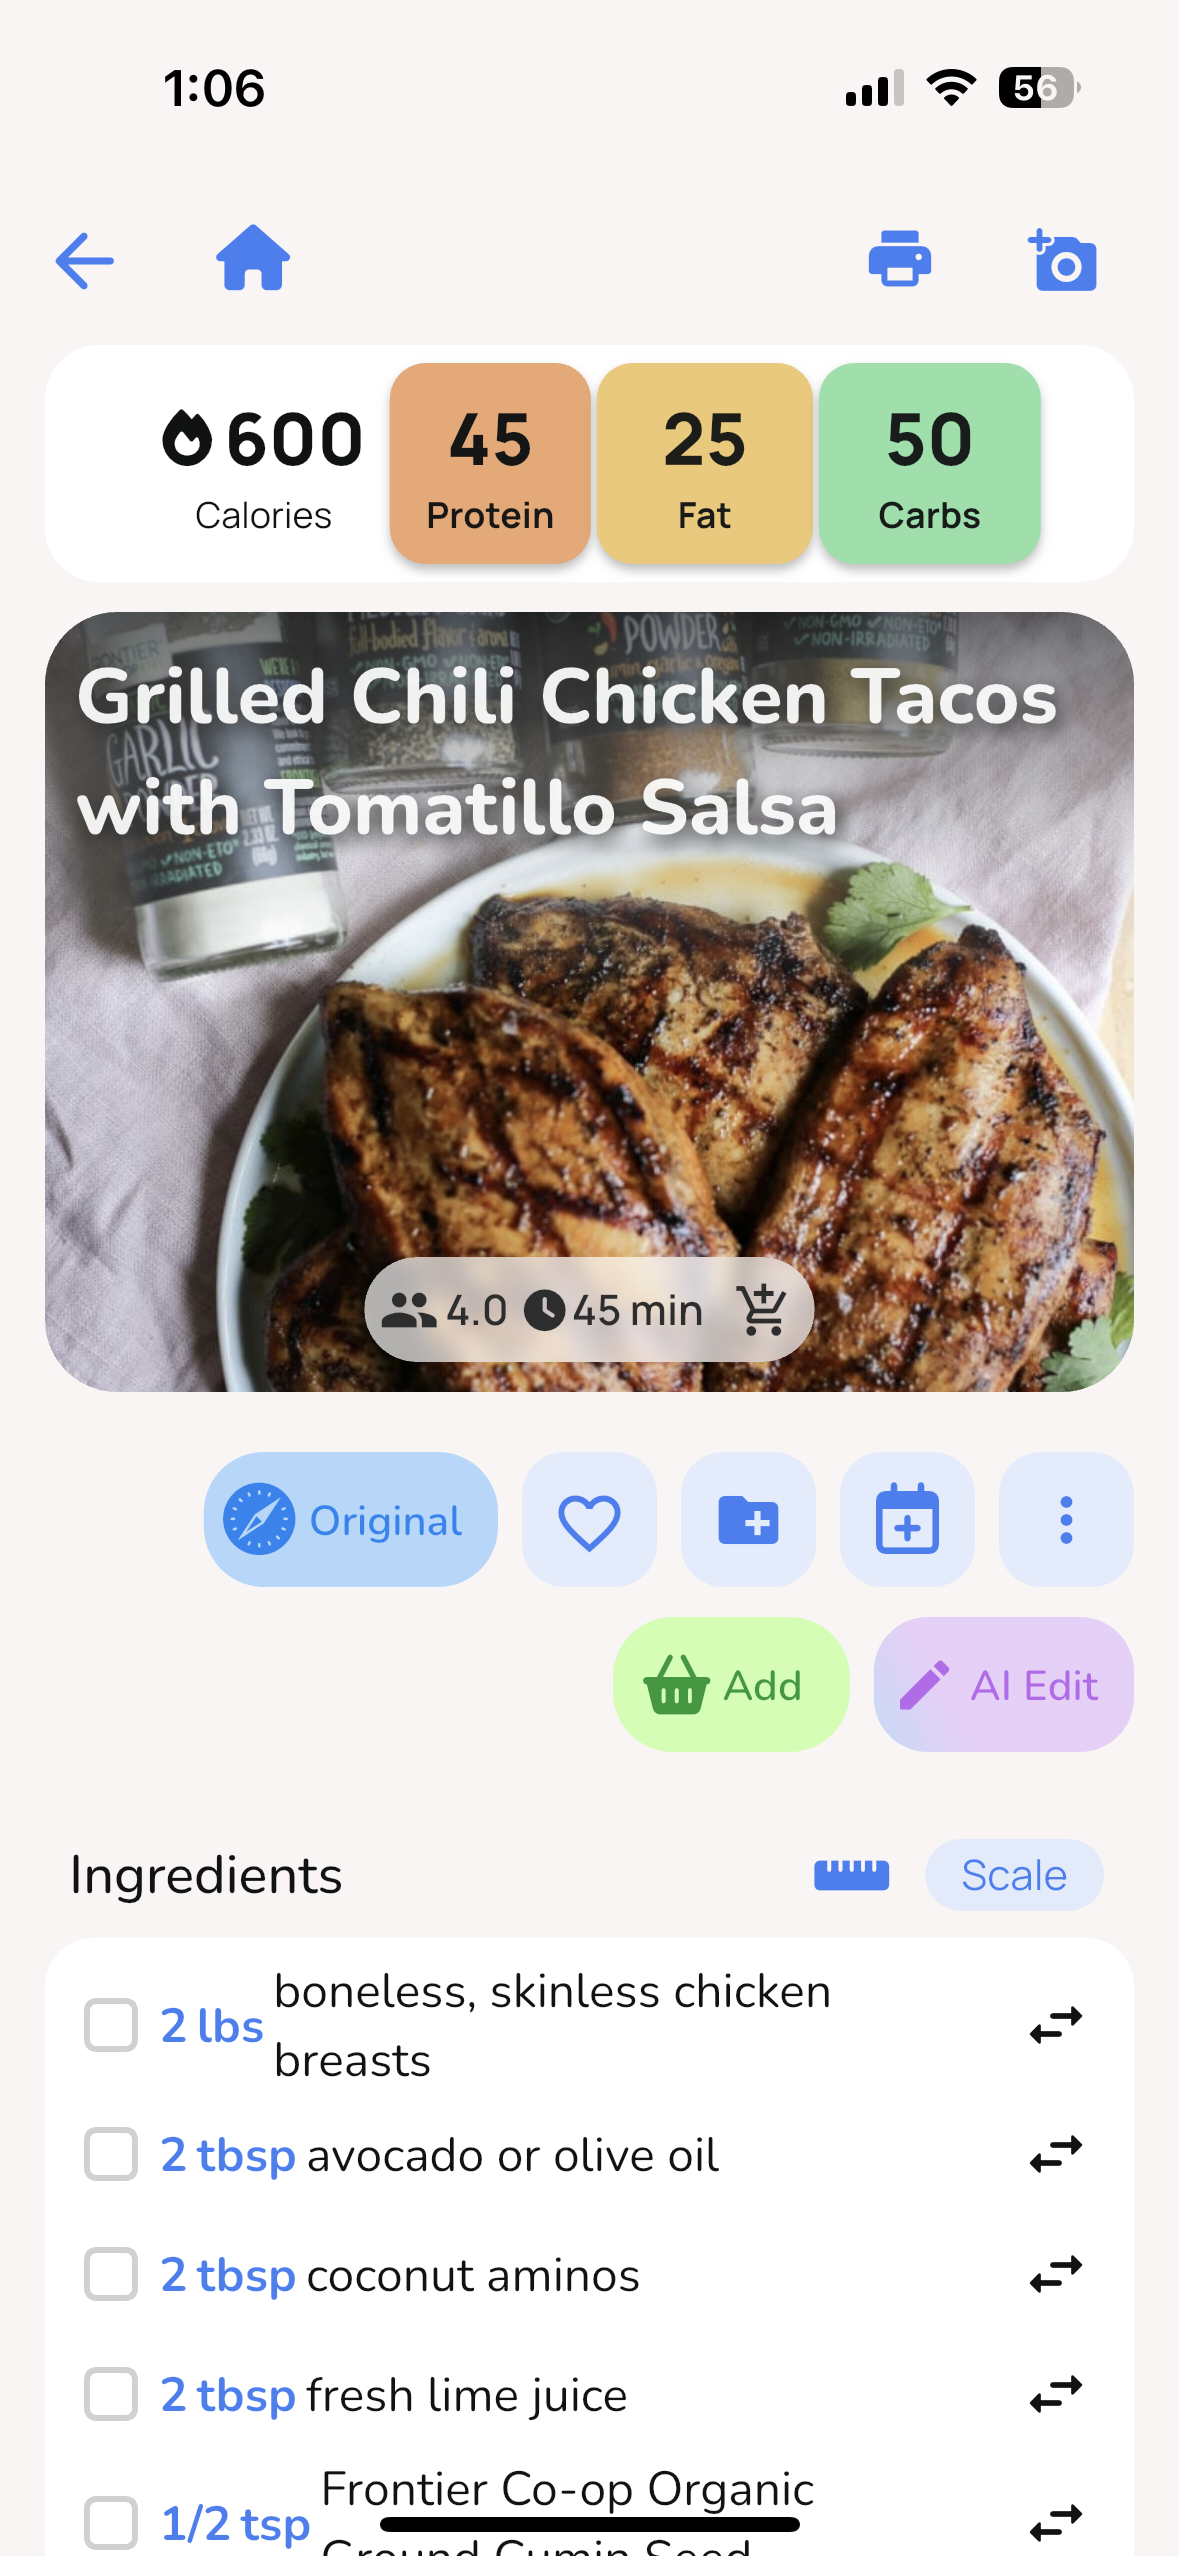
Planning Freezer Meals with Honeydew Recipe Manager
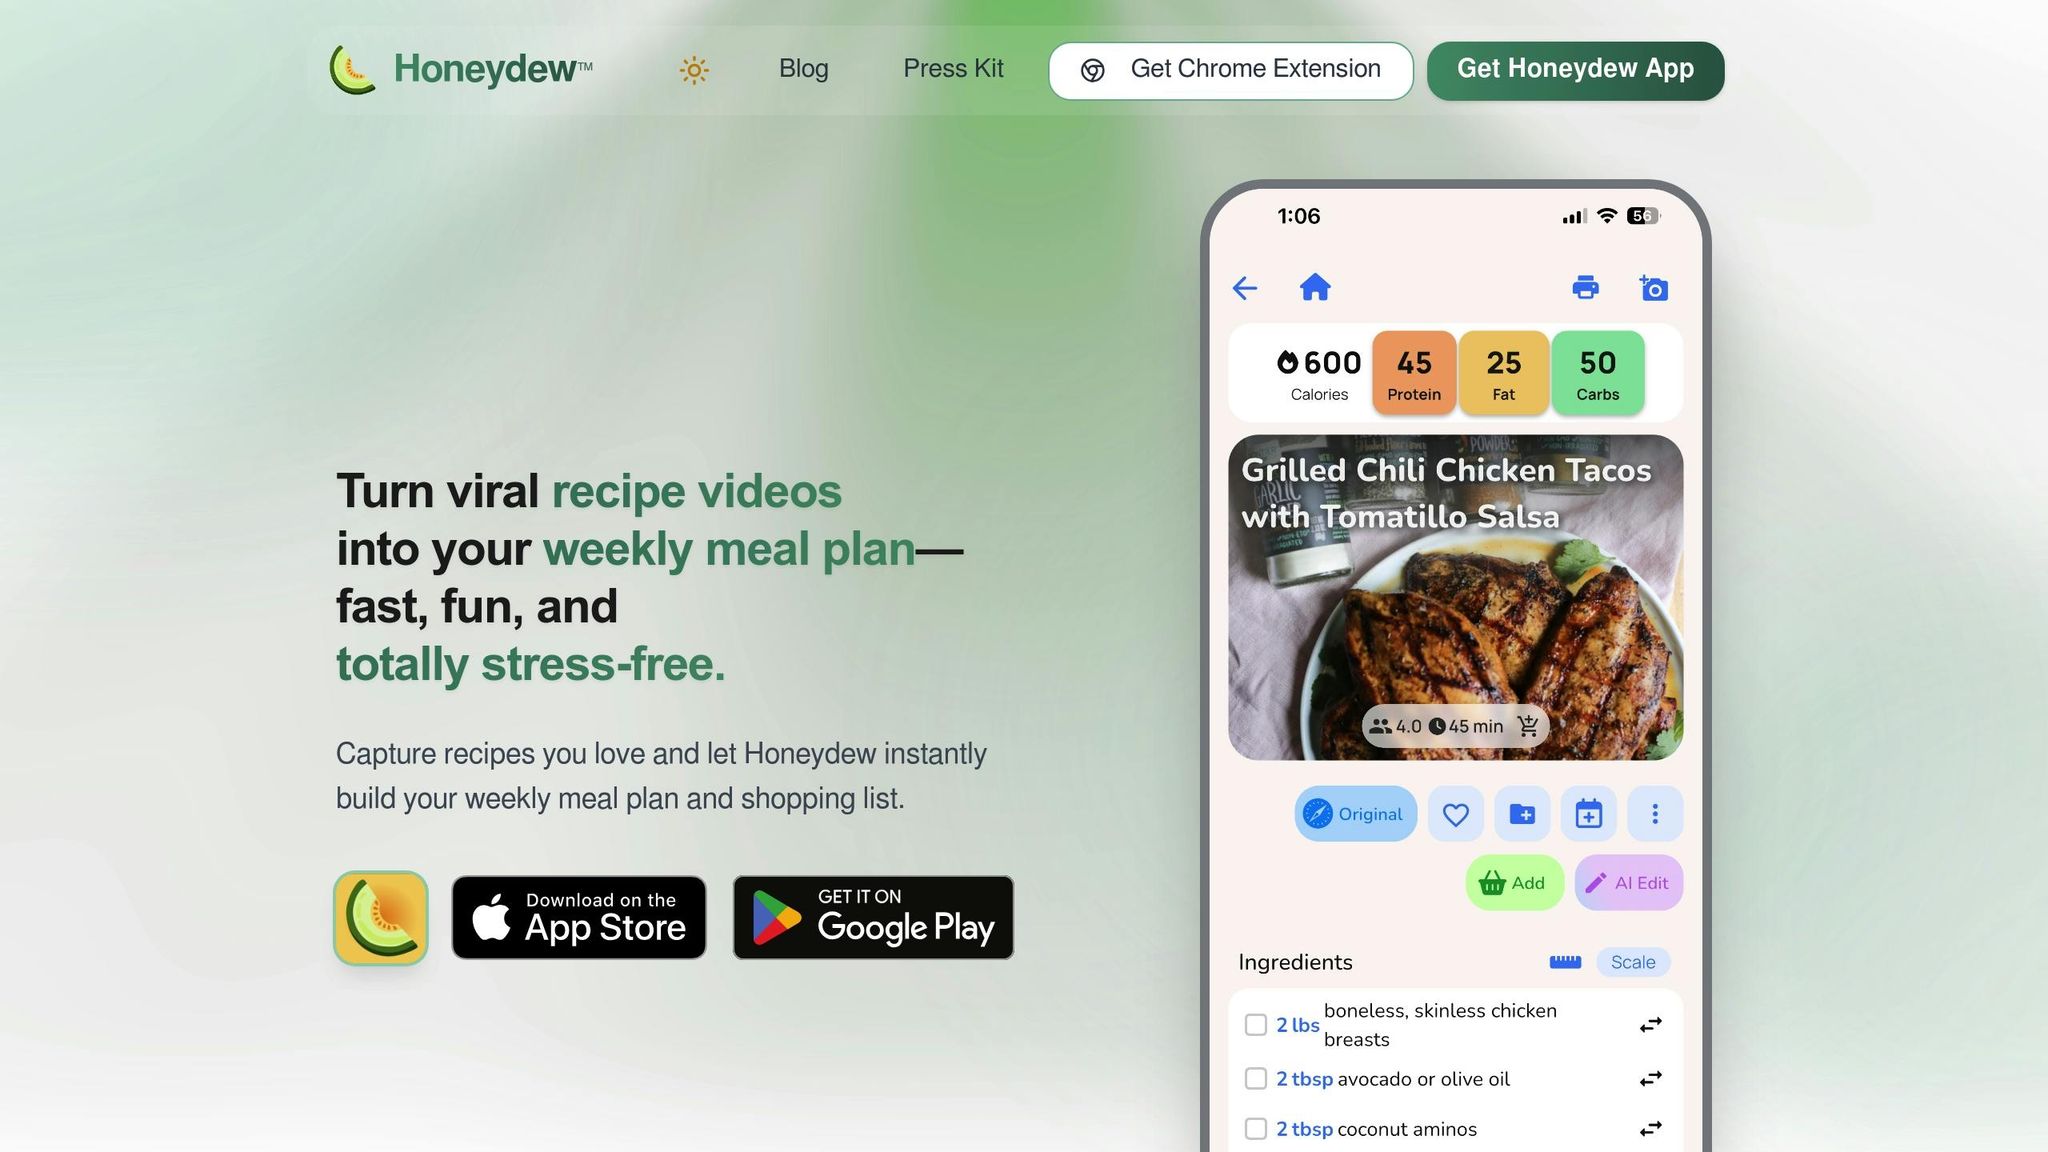
Technology can take the guesswork out of batch cooking. With Honeydew Recipe Manager, you can import freezer-friendly recipes from TikTok, Instagram, YouTube, or any website, building a collection of meals tailored to your tastes. Once your recipes are saved, the AI-powered meal planner generates custom weekly plans in seconds, making meal prep a breeze.
One standout feature is the automatic grocery list generator. Honeydew organizes your ingredients by store section, saving you from multiple trips to the store. You can even order groceries directly through Instacart. Plus, with household sharing, up to six family members can collaborate on meal planning, streamlining the process even further.
Freezer-Friendly Recipes to Try
If you're new to batch cooking, start with reliable classics like casseroles - think lasagna, enchiladas, or shepherd's pie. These freeze well for 3–6 months and reheat beautifully. Soups and stews, such as chili, chicken curry, or tomato soup, are also excellent options and can be stored for 2–6 months. For proteins, try meatballs in sauce, meatloaf, or marinated stir-fry meats, which typically last 3–6 months in the freezer.
Don't forget breakfast! Items like burritos, muffins, and breakfast panini are lifesavers for busy mornings and can be stored for 1–6 months. To keep individual items like meatballs or burger patties from sticking together, flash-freeze them on a sheet tray before transferring to a bag. Proper packaging is key - use airtight containers or freezer bags, and label everything with the dish name, freezing date, number of servings, and reheating instructions. This helps you keep track of what’s in your freezer and ensures you use older meals first.
Conclusion
Mastering the art of freezing and thawing can completely change the way you approach meal planning. Keeping your freezer at a steady 0°F not only preserves food but also saves you precious time. As Barbara Willenberg, a State Nutrition Specialist at the University of Missouri Extension, explains:
Foods are prepared at your convenience, and time is saved by doubling or tripling recipes that require a lot of preparation time.
The techniques highlighted here - like using proper packaging to avoid freezer burn and following safe thawing practices to maintain food quality - are designed to streamline your kitchen routine. Freezing small portions of ingredients, such as herbs or tomato paste, helps cut down on waste. Meanwhile, batch cooking allows you to stock up on extra meals for hectic days, reducing the temptation to rely on takeout. Plus, keeping your freezer full isn’t just practical - it’s energy efficient and can even keep food safe for up to 48 hours during a power outage.
Staying organized is the key to making it all work. Using a digital tool like Honeydew Recipe Manager can help you keep track of what’s in your freezer. With features like automatic grocery lists and AI-driven meal plans, it simplifies meal prep while ensuring you make the most of what you already have. This level of organization ties perfectly into the efficient meal planning strategies discussed throughout this guide.
FAQs
How can I prevent freezer burn on my frozen foods?
To avoid freezer burn, ensure your freezer stays at 0°F or colder. Use airtight, moisture-proof containers or heavy-duty freezer bags, removing as much air as possible before sealing. For extra protection, wrap items securely in plastic wrap or aluminum foil. Don’t forget to label and date everything - this makes it easier to use older items first. Also, try to limit how often you open the freezer door to help maintain a steady temperature and keep freezer burn at bay.
What’s the safest way to thaw frozen meals?
To keep your food safe while thawing frozen meals, it's crucial to avoid the danger zone - temperatures between 40°F and 145°F - where bacteria can multiply rapidly. The most reliable method? Thawing in the refrigerator. Simply place the food in its original packaging or a sealed container on a tray to catch any juices, and store it on the bottom shelf. This keeps the temperature consistently below 40°F and reduces the risk of cross-contamination.
If you're pressed for time, there are quicker options. You can submerge the sealed package in cold water, making sure to change the water every 30 minutes. Alternatively, you can use the defrost setting on your microwave. Just remember, with these methods, you need to cook the food immediately afterward to ensure safety. Avoid thawing at room temperature, in a conventional oven, or in hot water - these methods can lead to unsafe conditions.
For some extra help, the Honeydew Recipe Manager can streamline your meal prep by scheduling thawing times as part of your meal plan. This way, your meals are safely thawed and ready to cook when you need them. A little planning goes a long way in keeping your food both safe and delicious!
What foods should I avoid when making freezer meals?
When prepping freezer meals, steer clear of ingredients that don’t hold up well in the freezer. Items like lettuce, cucumbers, raw potatoes, and other high-water vegetables often lose their texture and become mushy. Watery fruits, cream-based sauces, mayonnaise, and raw eggs in the shell can also separate or develop unpleasant flavors after thawing, making them less than ideal for freezing.
The Honeydew Recipe Manager makes this process a breeze. You can import your recipes into the app, and it’ll automatically flag ingredients that aren’t freezer-friendly. Plus, it creates a tailored shopping list to ensure your meals freeze and reheat perfectly, saving you both time and effort.