Ultimate Guide to Sous Vide Meal Prep
• Updated
Sous vide cooking is all about precision and convenience. By sealing food in bags and cooking it in a water bath at a controlled temperature, you can achieve perfectly cooked meals every time. This method is ideal for meal prep, allowing you to batch-cook proteins, vegetables, and more with smarter ingredient prep, while locking in flavor, moisture, and nutrients. Here's what you need to know:
- Core Equipment: You'll need a sous vide machine (like the Anova or Joule), vacuum sealer or freezer bags, and optional accessories like containers, weights, and thermometers.
- How It Works: Set the water to a specific temperature (e.g., 140°F for chicken), cook the food evenly without overcooking, and store it for up to a week in the fridge or a year in the freezer.
- Meal Prep Tips: Batch-cook foods with similar temperatures, label bags for easy organization, and reheat using a sous vide bath for the best results.
- Best Foods to Cook: Proteins like chicken, steak, pork, and fish, as well as vegetables, are perfect for sous vide. Each ingredient has its ideal cooking temperature and time.
- Efficiency: Vacuum sealing extends shelf life, while reheating in the water bath preserves texture and flavor.
Sous vide meal prep saves time, reduces waste through pantry integration, and delivers consistent, high-quality meals. Whether you're cooking for the week or stocking the freezer, this method ensures your food is ready when you are.
Sous Vide Once, Savor All Week Introduction
Equipment You Need for Sous Vide Meal Prep
Getting started with sous vide meal prep doesn’t require a massive investment - just a few key tools to get you cooking like a pro. These essentials fall into three main categories: the sous vide machine, sealing equipment, and a few handy accessories to make the process smoother.
Choosing a Sous Vide Machine
The sous vide machine, or immersion circulator, is the heart of this cooking method. It clips onto a pot and heats water with incredible precision. Temperature control is the most important feature, with top machines maintaining accuracy within 0.1°C (0.2°F). This precision is what makes sous vide cooking so reliable compared to conventional methods.
For most home kitchens, a machine with 1,000–1,200 watts is plenty, but if you’re cooking larger batches, look for models offering 1,200–1,800 watts. For example, the Breville Joule Turbo can heat a gallon of water from 57°F to 190°F in about 22 minutes, while the Anova Precision Cooker Pro can handle up to 26 gallons (100 liters) for bigger projects.
Connectivity is another factor to consider. Wi-Fi-enabled models let you monitor and adjust cooking from anywhere, while Bluetooth options only work within close range. Avoid machines that shut off automatically when the timer ends, as this can leave food in the bacterial "danger zone" if not removed promptly.
| Model | Wattage | Connectivity | Price Range | Best For |
|---|---|---|---|---|
| Anova Nano 3.0 | 850W | Bluetooth | ~$64 | Budget-friendly beginners |
| Anova Precision 3.0 | 1,100W | Wi-Fi & Bluetooth | $160–$230 | Home cooks; onboard controls |
| Breville Joule Turbo | 1,100W | Wi-Fi & Bluetooth | $250 | Compact storage; app-only use |
| Anova Pro | 1,200–1,800W | Wi-Fi & Bluetooth | $450+ | Large-scale cooking |
"The Anova Precision Cooker is one of those rare tools in my kitchen that's both impressive and convenient... I also rely on it for batches of hard-boiled eggs and tender chicken breasts to eat throughout the workweek."
– Ashlee Redger, Writer, Serious Eats
When deciding between brands, it often comes down to personal preference. Anova machines feature physical controls and versatile clamps, which are great if you don’t want to rely entirely on your phone. On the other hand, Joule’s magnetic base and compact size make it ideal for tight spaces, although it does require app-based operation.
Once you’ve chosen your machine, the next step is selecting the right sealing method to ensure efficient cooking.
Vacuum Sealers and Other Sealing Methods
Properly sealing your food is crucial for sous vide cooking. Air trapped in the bag acts as an insulator, disrupting heat transfer and causing the bag to float, which can lead to uneven cooking. Vacuum sealers remove nearly all the air, ensuring consistent results.
For casual meal prep, BPA-free freezer bags, like Ziploc, work well when paired with the water displacement method. Simply place your food in the bag, seal it almost completely, and lower it into water. The pressure forces air out, and you seal the bag fully just before submerging it. Binder clips or clothespins can secure the bag to the pot, keeping the seal above water while the food stays submerged.
For those serious about meal prep, a vacuum sealer is a game-changer. It’s perfect for seasoning in bulk and long-term freezer storage. Vacuum-sealed meat can last up to three years in the freezer, and cooking from frozen usually only adds about 30–60 minutes to your cook time.
"Investing in a vacuum sealer is the single biggest upgrade you can make to your setup. It transitions you from dabbling to mastering the craft."
– Silas, Founder, Flavor365
Prices for home vacuum sealers range from $50 to over $200. When using one, try the "cuff" technique - fold the top of the bag outward before filling it to keep the sealing area dry. This helps ensure a strong seal. During long cooks, binder clips can keep the seal dry and secure.
These sealing methods help ensure your food cooks evenly and retains its flavor and nutrients.
Helpful Accessories
While the basics are enough to get started, a few accessories can make sous vide cooking even more efficient. A standard stockpot works fine for beginners, but polycarbonate containers (like those from Cambro) are preferred for their larger capacity and ability to maintain consistent temperatures during long cooks. Many of these containers come with fitted lids to reduce water evaporation.
Submersion tools are also a must for keeping food fully underwater. Floating bags can cause uneven cooking, especially with vegetables. Heavy ceramic bowls, large spoons, or specialized sous vide weights can help. If the bags still move, binder clips attached to the pot’s rim can keep them in place.
For longer cooking times, ping pong balls or special insulation balls floating on the water’s surface can slow evaporation and heat loss. This simple trick saves you from constantly refilling water. An instant-read thermometer is another handy tool for double-checking your circulator’s accuracy, especially for delicate items like eggs where even a small temperature difference can matter.
Finally, searing your food after sous vide cooking is essential for flavor and texture. A quick sear in a hot cast iron skillet creates a caramelized crust through the Maillard reaction, adding depth to your dish. If you’re prepping meals for later, plunge the sealed bags into an ice bath immediately after cooking to stop the process and safely store them.
With these tools and techniques, you can streamline your sous vide meal prep while ensuring delicious, consistent results. To keep your equipment in good shape, descale your immersion circulator every few months using a 50/50 mix of water and white vinegar heated to 140°F for 30 minutes.
How to Meal Prep with Sous Vide
This section walks you through the meal prep process using sous vide, from prepping your ingredients to cooking and reheating. By following these steps, you’ll save time while ensuring consistently delicious results with these meal planning tips.
Preparing Your Ingredients
Start by trimming and portioning proteins evenly after removing them from store packaging. Before filling your bags, label them with the contents, date, and target temperature/time using a permanent marker. Writing on the bags before they’re filled makes the process much easier.
Season your proteins with dry rubs, marinades, or aromatics like herbs, garlic, or lemon. Go easy on strong spices - flavors intensify during long sous vide cooking. For fish, try a quick salt-and-sugar cure: sprinkle the fillets, let them sit for 10 minutes, then rinse and pat dry. This enhances texture and flavor. If your fish has skin, score it before bagging to ensure a better sear later.
To ensure even cooking, arrange bags so they don’t overlap in the water bath. For delicate items like burger patties or meatballs, freeze them for 10–15 minutes before sealing to help them maintain their shape under vacuum pressure. Adding a tablespoon of olive oil or butter to bags with fish or vegetables prevents sticking during cooking.
"By sealing meals into plastic bags and submerging them in precise, temperature-controlled water baths, the sous vide method gently cooks your food in a way that retains moisture and intensifies flavors." – Breville
If you don’t have a vacuum sealer, use the water displacement method for shorter cooks (1–4 hours).
Once your ingredients are prepped and labeled, you’re ready to move on to batch cooking and storage, or use a smart meal planner to organize your week.
Cooking in Batches and Storing
To save time, group ingredients by their cooking temperatures. For example, chicken and root vegetables can both be cooked at 150°F [65°C], allowing you to prepare multiple meals at once. If your bags float in the water bath, weigh them down with a heavy plate or magnets.
After cooking, immediately transfer the bags to an ice bath (50% ice, 50% water) for 30–60 minutes. This rapidly cools the food below 41°F [5°C], ensuring safety and preserving flavor. Once cooled, label and store the bags properly.
Use waterproof markers to clearly label each bag with details like the ingredient name, seasoning type, and cooking date. Properly chilled and sealed meals can be stored in the refrigerator for:
- Chicken and eggs: 5–7 days
- Steak or pork: 5–6 days
- Vegetables: 4–5 days
For longer storage, vacuum-sealed meals can be frozen for up to a year. You can also prep raw proteins in bulk by seasoning and vacuum-sealing them before freezing. These can be cooked directly from frozen by adding 30–60 minutes to the usual sous vide time. Vacuum-sealed raw meats can last up to three years in the freezer.
With everything stored properly, your meals are ready for reheating and finishing touches.
Reheating and Final Touches
When reheating, use a sous vide bath set at the original cooking temperature or slightly lower to avoid overcooking. Avoid microwaves or ovens, as they can create uneven heating and dry out proteins.
| Food Type | Bath Temperature | Approx. Time (from Fridge) |
|---|---|---|
| Steak / Pork Chop | 130°F–135°F | 30–60 minutes |
| Chicken Breast/Thigh | 145°F–150°F | 45–75 minutes |
| Fish Fillets | 120°F–125°F | 20–30 minutes |
| Vegetables | 185°F | 20–45 minutes |
| Frozen Portions | Original Cook Temp | Add 30–60 mins |
After reheating, pat proteins dry and sear them briefly (1–2 minutes per side) in a hot cast iron skillet with a high-smoke point oil like canola or avocado oil. This step creates a flavorful crust. Only reheat each portion once. For seafood, skip the microwave entirely - it ruins the delicate texture. Stick to reheating fish in the sous vide bath to maintain its quality.
What to Cook: Best Ingredients for Sous Vide
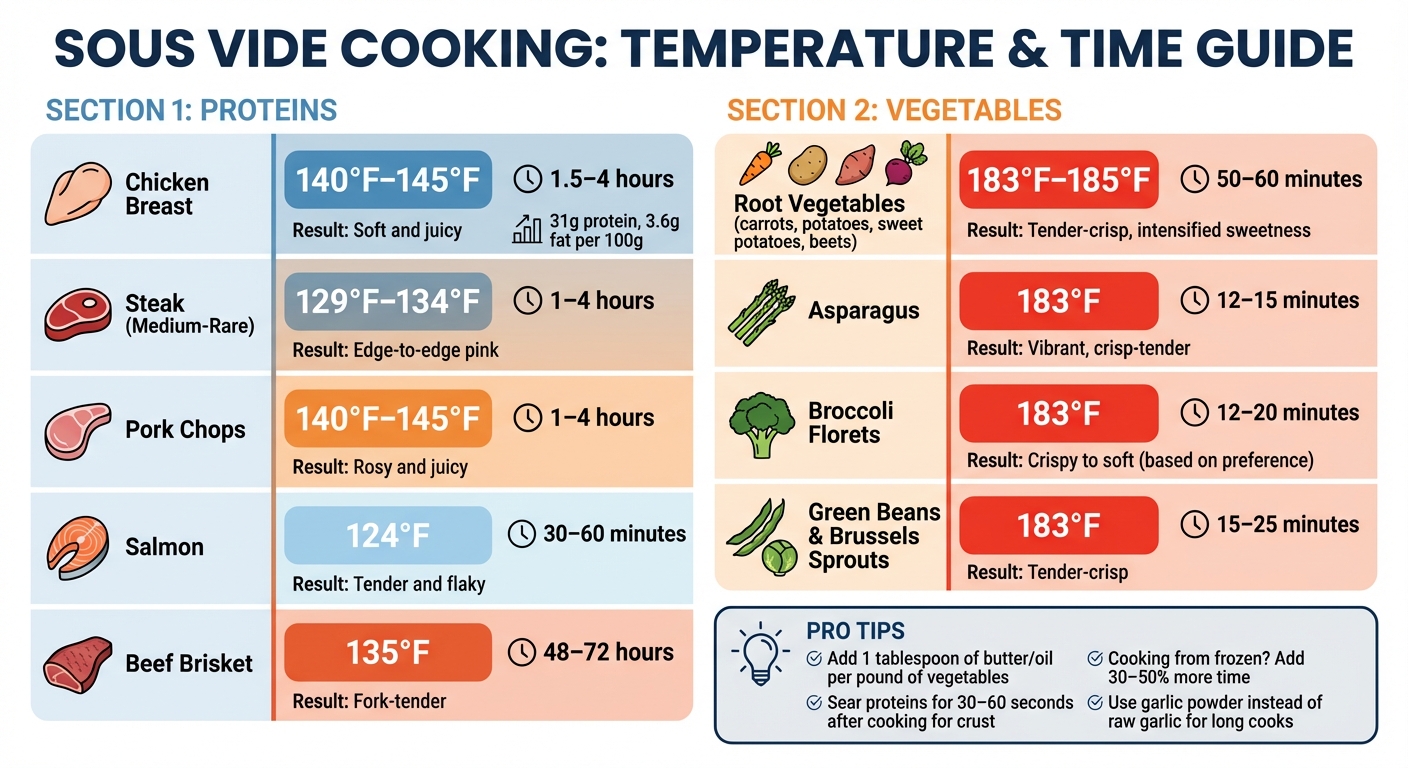
Sous Vide Cooking Times and Temperatures Guide for Proteins and Vegetables
The key to successful sous vide cooking lies in selecting ingredients that respond well to precision temperature control. Certain proteins and vegetables thrive in this method, delivering exceptional flavors and textures.
Proteins: Chicken, Beef, Fish, and Pork
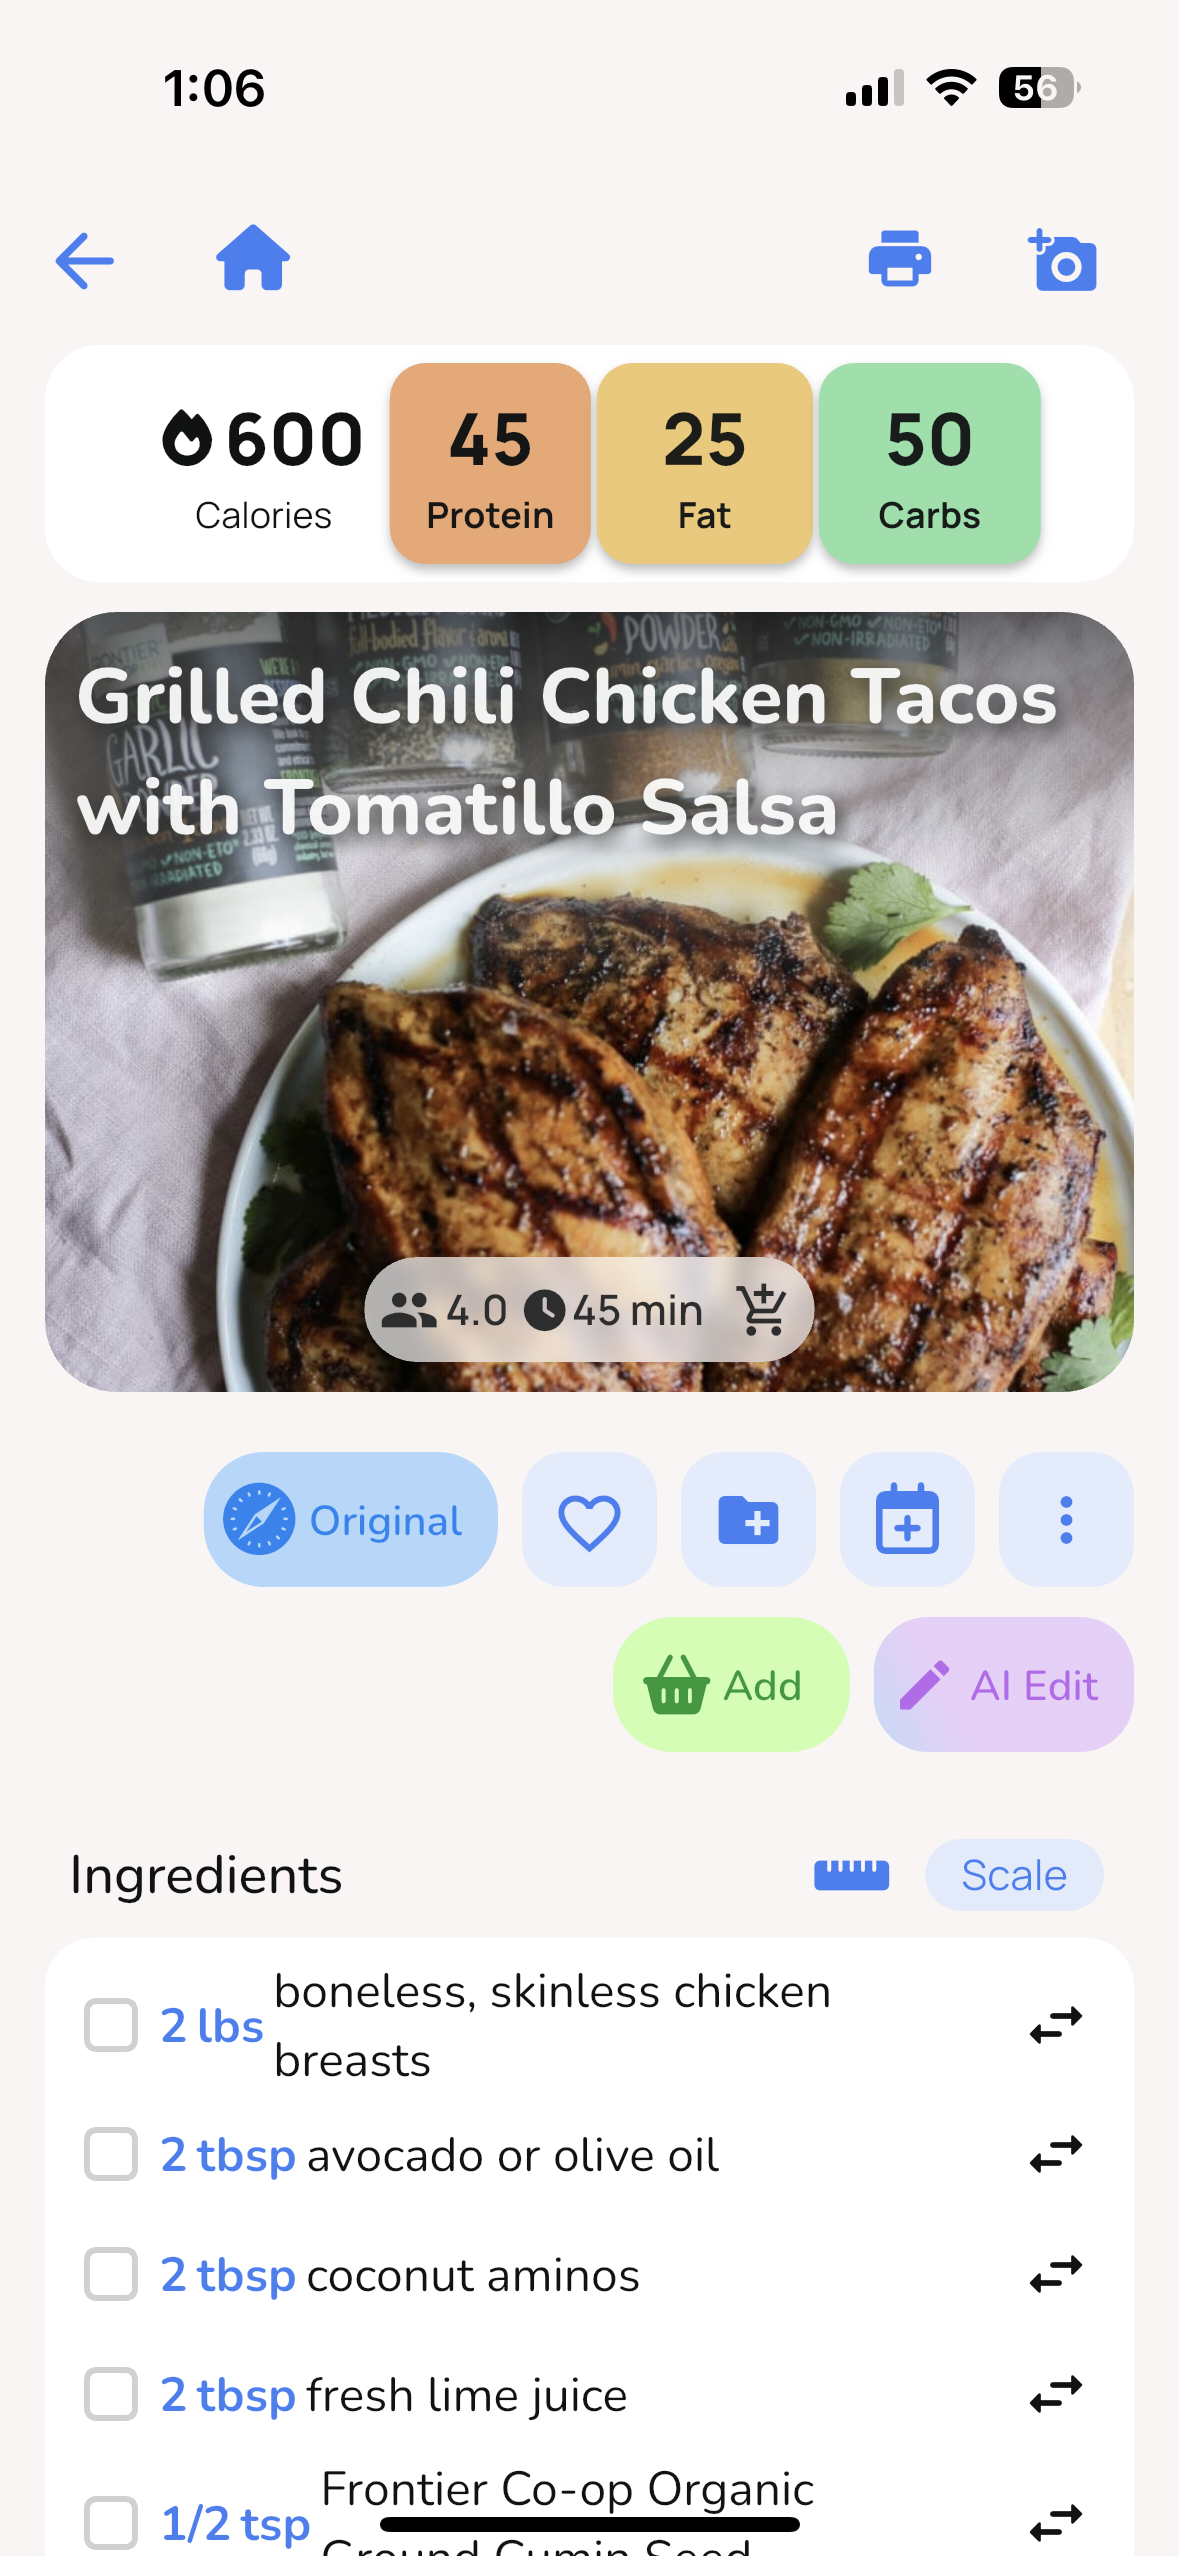
Chicken breast is a great starting point for sous vide beginners. This method prevents the dryness often associated with traditional cooking, leaving the meat tender and juicy. A 100g serving offers 31g of protein and just 3.6g of fat. Cook chicken breast at 140°F–145°F for 1.5–4 hours for consistently moist results.
Steaks, whether filet mignon, ribeye, or strip, are a standout choice. Sous vide ensures medium-rare perfection from edge to edge at 129°F–134°F, without the overcooked outer bands typical of other methods. Tougher cuts like beef short ribs, brisket, or pork shoulder benefit from extended cooking times - 24 to 72 hours at 135°F - to break down collagen into tender gelatin.
"Sous vide cooking turns out the most tender, juicy, meat and flavorful food you will ever make!" – Chellie Schmitz, Creator, Art From My Table
Pork chops and tenderloin are another excellent option, staying succulent at 140°F–145°F - temperatures that are tricky to control with traditional high-heat methods.
Fish, such as salmon and halibut, shine with sous vide because the gentle heat prevents protein tightening and moisture loss. At 124°F for 30–60 minutes, you'll achieve a flaky, delicate texture.
| Protein | Temperature | Time Range | Result |
|---|---|---|---|
| Chicken Breast | 140°F–145°F | 1.5–4 hours | Soft and juicy |
| Steak (Medium-Rare) | 129°F–134°F | 1–4 hours | Edge-to-edge pink |
| Pork Chops | 140°F–145°F | 1–4 hours | Rosy and juicy |
| Salmon | 124°F | 30–60 minutes | Tender and flaky |
| Beef Brisket | 135°F | 48–72 hours | Fork-tender |
For the best finish, sear proteins for 30–60 seconds to create a flavorful crust through the Maillard reaction. When cooking for extended periods, use garlic powder instead of raw garlic to avoid metallic flavors.
Vegetables and Sides
Vegetables require higher temperatures than proteins to achieve their ideal texture. Cooking at around 183°F–185°F breaks down pectin and cellular structures, unlocking their natural flavors without turning them mushy.
Root vegetables like carrots, potatoes, sweet potatoes, parsnips, and beets are perfect for sous vide. They retain a tender-crisp texture while their natural sweetness intensifies. For example, carrots cooked at 185°F for 50–60 minutes develop a rich sweetness, especially when paired with butter and honey in the cooking bag.
Firm greens, such as asparagus, broccoli, cauliflower, green beans, and Brussels sprouts, also perform well. Asparagus needs only 12–15 minutes at 183°F for a vibrant, crisp-tender finish. Broccoli florets, depending on personal preference, take 12–20 minutes for a texture ranging from crispy to soft.
"By holding the vegetable at its ideal final temperature, you can achieve a tender-crisp texture that's impossible to overshoot. The cell walls (pectin) break down perfectly without turning to mush." – Silas, Founder, Flavor365
To enhance flavor, add about 1 tablespoon of high-quality fat - like butter, olive oil, or ghee - per pound of vegetables. After cooking, pat the vegetables dry and sear them in a hot skillet for 30–60 seconds to achieve a professional-quality finish. Vacuum sealing is essential for even heat distribution and keeping the bags fully submerged. Cooking from frozen? Simply extend the cooking time by 30–50% to achieve the same results.
5-Day Sous Vide Meal Prep Plan
Meal Schedule for 5 Days
Planning meals in advance can make your week less stressful and ensure you're eating well-balanced dishes every day. This 5-day plan uses sous vide cooking to provide consistent, high-quality meals that are easy to reheat. The trick? Batch-cooking proteins at similar temperatures and pairing them with sides that hold up well when reheated.
| Day | Breakfast | Lunch | Dinner | Cook Temp/Time |
|---|---|---|---|---|
| Monday | Egg white bites (spinach/feta) | Chicken breast with quinoa | Steak with garlic green beans | Chicken: 140°F (1.5–4h); Steak: 130°F (1–4h) |
| Tuesday | Soft-boiled eggs on toast | Turkey breast with brown rice | Salmon with lemon asparagus | Eggs: 167°F (13m); Salmon: 122°F (30–45m) |
| Wednesday | Greek yogurt with poached pears | Chicken & spinach wrap | Shrimp with zucchini noodles | Pears: 175°F (45m); Shrimp: 135°F (45m) |
| Thursday | Egg bites (pepper/cheddar) | Beef strips with cauliflower mash | Cod with quinoa salad | Beef: 131°F (2h); Cod: 131°F (45m) |
| Friday | Oats with sous vide apple slices | Leftover steak bowl | Turkey meatballs in marinara | Apples: 183°F (45m); Meatballs: 145°F (1h) |
To keep your meals safe and fresh, transfer your cooked proteins directly into an ice bath (a mix of 50% ice and 50% water) for 30–60 minutes before refrigerating. This method, known as cook-chill, halts bacterial growth and keeps foods safe for 4–7 days in the fridge. When it’s time to eat, reheat sealed bags in a 131°F water bath for 15–30 minutes. If you’re short on time, boiling water works too - just heat for 6 minutes. Egg bites can be reheated in the microwave at 70% power for 1 minute and 30 seconds.
Remember, cooked vegetables usually stay fresh for about 4–5 days in the fridge.
Time-Saving Tips
Want to make meal prep even easier? Here are a few strategies to shave off prep time without sacrificing flavor.
- Batch-cook proteins at the same temperature: Cooking multiple proteins together is a game-changer. For instance, chicken breast, turkey breast, and pork loin all cook well at 145°F, letting you prepare several meals in one go.
- One-bag meals: Combine proteins, vegetables, and aromatics in a single bag for an all-in-one dish. For example, chicken with broccoli and garlic cooks evenly and cuts down on cleanup. You can even prep these meals in advance, freeze them flat to save space, and cook directly from frozen - just add 30–60 minutes to the usual cooking time. Label each bag with cooking instructions so you don’t have to dig up recipes mid-week.
- Buy in bulk and repurpose: Large cuts of meat, like pork shoulder, can stretch across multiple meals. Use one cut for steaks, pulled pork, ragu, or carnitas. Pre-season everything with marinades or dry rubs, then portion and store the bags on a sheet pan arranged by meal day. This keeps things organized and prevents leaks.
For that perfect finish, pat proteins dry with a paper towel after removing them from the bag. Then give them a quick sear in a hot cast iron skillet - just 1–2 minutes per side. This step adds a golden crust and boosts the aroma, making your home-cooked meals feel like they came straight from a restaurant kitchen.
Using Honeydew Recipe Manager for Sous Vide Meal Prep

Incorporating tools like Honeydew Recipe Manager can take your sous vide meal prep to the next level. This app simplifies the entire process by managing key details like temperatures, cooking times, and batch schedules. With Honeydew, you can easily import sous vide recipes from social media or websites, as it automatically extracts ingredients, measurements, and instructions (e.g., "140°F for 2–3 hours"). It’s a one-stop solution for organizing everything from recipe selection to grocery shopping.
AI Recipe Planning
Honeydew’s AI feature eliminates the hassle of manual planning by generating sous vide meal schedules based on what you already have at home. For example, if your pantry includes chicken breasts, beef sirloin, and mini potatoes, the AI might suggest a 5-day plan with meals like chicken cooked at 140°F for 2–3 hours, beef at 130°F, and salmon at 125°F. It even groups meals by similar cooking temperatures to optimize batch preparation. Reheating instructions are also tailored, typically set 5–10°F below the original cooking temperature to maintain texture and flavor. This level of precision ensures your meal prep is both efficient and delicious.
Managing Grocery Lists and Ingredients
Once you’ve imported your sous vide recipes, Honeydew automatically generates aisle-sorted grocery lists tailored to US standards. Planning to cook 10 pounds of chicken breast at 140°F for the week? The app scales the ingredient quantities for you and syncs with Instacart for seamless ordering. Missing an item? Honeydew offers smart substitutions, such as swapping chicken breasts for thighs (both work well at 140–150°F) or replacing zucchini with broccoli (both cook at 183°F for about 12 minutes). This flexibility lets you adjust your plan without starting from scratch.
Tracking Nutrition and Sharing with Family
Honeydew doesn’t stop at planning and shopping - it also helps you track nutrition. It calculates calories and macros for every sous vide meal. For instance, a 4-ounce chicken breast cooked at 140°F contains about 165 calories and 31 grams of protein, while a cup of broccoli at 183°F adds roughly 50 calories . The app totals these values for your 5-day plan, helping you meet goals like 2,000 calories or 150 grams of protein per day. You can also share recipes, grocery lists, and meal plans with up to six family members through its household sharing feature. Plus, its portion tool adjusts ingredient quantities when scaling recipes for a group of 4–6 people, keeping your grocery list and nutritional data accurate.
Conclusion
Sous vide meal prep transforms your weekly cooking routine, offering precise results with minimal effort. By setting the water to an exact temperature - like 140°F for chicken breast or 129°F for a medium-rare steak - you eliminate the risk of overcooking entirely [5,6,9].
Batch cooking is another game-changer, saving time by preparing multiple meals at once. Vacuum sealing extends the shelf life of your food, keeping it fresh for up to 4 days in the fridge or as long as 3 months in the freezer [9,49]. Reheating is a breeze too - just use the water bath to restore the original texture and flavor without the mess of traditional reheating methods [2,9,12,49].
"Whether you're chasing gains or just trying to stay on top of a healthy diet, sous vide meal prep offers a consistent, time-saving method to simplify your week." - Kevin Curry, Author, Fit Men Cook
Adding digital tools into the mix makes the process even smoother. Apps like Honeydew Recipe Manager take the hassle out of meal planning by organizing recipes, creating detailed grocery lists, and even grouping meals with similar cooking temperatures. This means you can optimize your water bath space and cut down on active cooking time [9,49].
With the right tools, efficient batch cooking techniques, and a little help from digital solutions like Honeydew Recipe Manager, sous vide meal prep becomes an easy and reliable way to maintain a healthy, stress-free cooking routine.
FAQs
Is sous vide meal prep safe?
Sous vide meal prep is a safe cooking method thanks to its precise temperature control. This accuracy minimizes contamination risks and ensures food is cooked evenly and thoroughly. Additionally, it helps prevent overcooking, making it a dependable choice for preparing meals with safety and consistency in mind.
Can I cook sous vide without a vacuum sealer?
Yes, you can absolutely cook sous vide without a vacuum sealer. A popular workaround is the water displacement method. Here’s how it works: place your food in a zipper-lock bag, leaving a small opening at the top. Slowly lower the bag into a water bath, letting the pressure of the water push out the air. Once most of the air is gone, seal the bag completely. This technique helps eliminate air pockets, ensuring the food stays in close contact with the water for even cooking - just like using a vacuum sealer.
How do I keep bags from floating?
To keep sous vide bags from floating, start by removing any extra air trapped inside. A vacuum sealer works best for creating an airtight seal, but you can also use the water displacement method - just make sure no air bubbles are left behind. If the bag still floats, try adding weights like stainless steel or ceramic objects, or secure it with heavy-duty clips. These simple tricks ensure the bag stays submerged, leading to even cooking every time.